Salmon Meunière

Salmon Meunière

I learned a lot while making this recipe.  Here are my top three – and then on to the food…

First: it is very important to choose your butcher carefully when you get seafood.  I mistakenly used a grocery store butcher that I usually trust.  Apparently the betray you when it comes to seafood.  The salmon wasn’t scaled properly and still had all it’s pin bones.  And, not only that, but the cut was uneven.  I wound up slicing off a decent amount of fish that wasn’t really usable to get even portion sizes!  I was pretty disappointed.  So make sure you choose a reputable seller, double check that they scaled and removed the bones prior to purchasing, and then hope you have a very sharp knife if they don’t cut evenly!

deboning a salmon filetIf you do get unlucky enough to have to debone the fish yourself it’s really easy.  Just annoying.  Wash a pair of pliers with hot water and soap.  Carefully push the flesh of the salmon in and grasp the tip of the pin bone.  Pull it as carefully as you can to prevent the flesh from ripping.  It’s not bad if it does, it just isn’t as pretty anymore.  Make sure you get all the bones – you’ll be able to feel them if you gently run your hand down the length of the fish.  If you are doubly unlucky and they didn’t remove all the scales just flip the salmon over to skin side up.  Run the blade of the knife down the fish and watch all the clear, inedible scales pop off.  But you can always skip both these steps by choosing a better store!  Which I will do for all my fish from now on.

Second: experimenting with a very basic, traditional recipe turns out sub-par results.  I tried really hard to fiddle with this this recipe a bit and make it my own.  Turns out this recipe is so straight forward it doesn’t do well with a lot of tweaking.  I tried the sauce twice before I finally gave up and realized sometimes the old school way is the best way.

Third: no matter how many times I try it I really, really hate salmon.  It’s very fishy, even fairly fresh, and fatty.  The flavor is just… not my favorite.  If I’m going to spend this much on a protein you can bet it’ll be something I actually want to eat.  Unlucky for me, there are still a handful of salmon recipes left in the official Breath of the Wild guide…
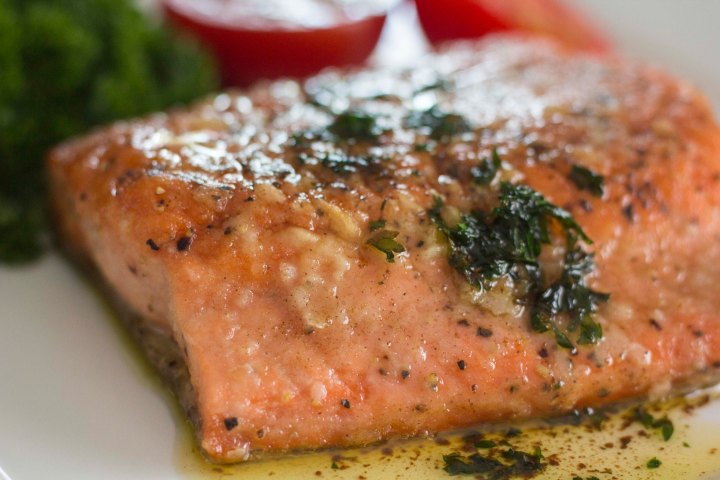
Salmon Meunièredifficulty and time meter

salmon meuniere ingredients

You’ll find a lot of themes in these recipes.  One of them is to allow the meat to warm up to room temperature and to pat it dry before seasoning.  I explain why in my Meat and Rice Bowl recipe.  And that’s exactly how we are going to start salmon meunière – take the salmon out of the fridge about 30 minutes before cooking and allow to warm up to room temperature.

While it’s warming up wash and pull the leaves off the parsley.  It’s pretty easy, actually.  Just grab the stems and line up the leaves, place the knife edge down right at the base of the leaves, and gently but firmly pull the parsley through the knife blade.  It’ll get most of the stems off and leave you with a nice pile of leaves.  And no, it’s not one of the piles that hides a korok seed.  Sorry.  Roughly chop the parsley into pieces, they don’t have to be perfect.  You’ll want a small handful of parsley.  If you’re using fresh lemon cut it in half and squeeze the juice of one of them.  You only need 3/4 tablespoon so no need to go crazy. Smash the garlic by placing the flat of a knife blade against the garlic clove and smash your hand into the blade.  Never do this on the edge of the knife and never smash the knife down – both these could result in some serious cuts and I refuse to be held responsible for that.  When the garlic is smashed peel off the skin.  Get the butter cut and ready to go and play a few rounds of Splatoon 2 until the salmon is ready.

dreding salmon in flour
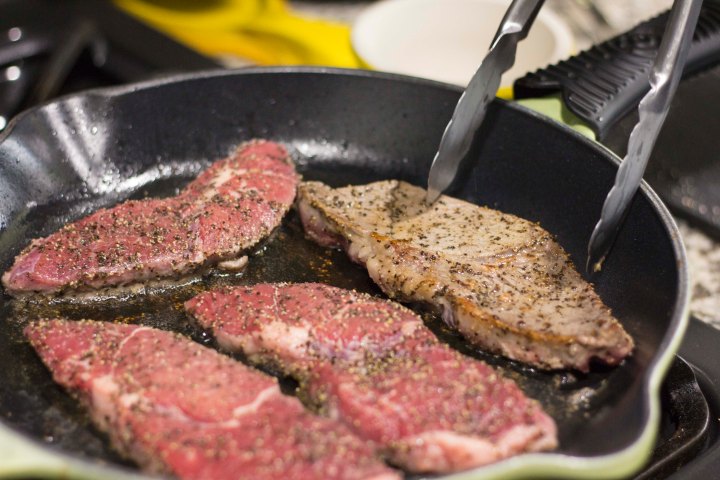
When you’re ready to cook pat the salmon dry and season with kosher salt and pepper.  Turn your burner on to medium, add your oil, and get your pan nice and hot.  When the pan is hot add the butter.  Be really careful, the butter will splatter and pop as the water cooks out of it!  We add the salmon when the butter stops popping so when the mixture starts to calm down spread the flour out on a plate and dip and pat the salmon into the flour to completely coat it.  This is called dredging and it’s a pretty awesome technique to get a nice, crispy, almost fried skin.  Make sure you don’t dredge too early or the flour just gets soaked into the fish and it doesn’t fry quite as well.

pan fried salmon filet

Add the fish to the pan, skin down, laying it away from you to prevent any oil splatters.  Let it cook for 3-4 minutes on this side then flip the fish and allow it to cook for 3 more minutes.  Take it out of the pan, place it on a plate, and cover with foil.  You’ll want to do this next part quickly – the longer the fish sits under that foil the less crispy it gets!

Using a few paper towels rolled in a ball and a heavy duty oven mitt pour out the oil into a heat safe container and wipe the inside of the pan.  We don’t want to keep any of the old mixture since it’s likely to burn if it cooks too long.

melting butterbrowned butterAdd the new butter and smashed garlic and wait for it to melt and cook down.  It will take 2-3 minutes to turn brown and nutty and delicious.  Remove the pan from the heat (don’t follow my photo example and just turn off the heat.  It’s not good enough!).  Add the lemon and parsley and stir to combine.  Again, use caution, this mixture may splatter as well.  Uncover the fish, pour the sauce over, and serve immediately.  PS- if your pan is still really hot your parsley may brown pretty quickly and it’ll make your sauce look a bit burned.  I promise, if you use this recipe it won’t burn and will still taste good!

salmon meuniere close up

Link’s Salmon Meunière

    • Tabantha Wheat
    • Goat Butter
    • Hearty Salmon

Salmon Meunière

  • Servings: 2
  • Difficulty: moderately easy
  • Print

Salmon drizzled with a meunière butter lemon sauce
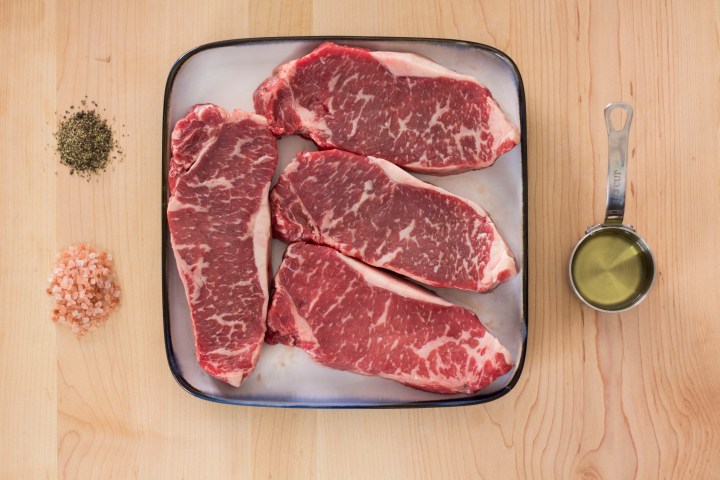

Salmon

  • 2 8 oz portions salmon
  • 1-2 tablespoons kosher salt
  • 1-2 teaspoons pepper
  • 2 tablespoons oil
  • 1 tablespoon unsalted butter
  • 1/4 cup flour

Sauce

  • 3/4 tablespoon lemon juice (juice from half a small lemon)
  • 5 tablespoons unsalted butter
  • 2-3 tablespoons chopped parsley
  • 1 large garlic clove, smashed

Directions

  1. Warm the salmon to room temperature.
  2. Using the blade of your knife pull the leaves off the parsley by gently but firmly running the blade along the stems. Roughly chop into small pieces.
  3. Cut the lemon and juice one half, making sure not to get any seeds in the juice.
  4. Using the flat of a knife blade smash the garlic and remove the skin.
  5. Pat the salmon dry and season with kosher salt and pepper.
  6. Heat a pan over medium with the oil.
  7. When the oil is hot add the butter. Be careful, as this will splatter and pop until all the water is cooked out of the butter.
  8. When the butter mixture starts to calm down add the flour to a plate and dredge the salmon by patting it into the flour. Immediately add the salmon to the pan, skin down, by laying it away from you.
  9. Cook the salmon for 3-4 minutes, turn, and cook for another 3 minutes.
  10. Remove the salmon and cover with foil.
  11. Acting quickly pour the remaining oil mixture out of the pan and wipe out with paper towels. Be careful not to burn yourself and use proper heat proof equipment.
  12. Add the 5 tablespoons of butter and garlic to the pan and allow to melt and brown, about 2-3 minutes.
  13. Remove the pan from the heat and add the lemon and parsley. Again, use caution when you add the lemon because it may splatter and pop.
  14. Immediately pour over the salmon filets and serve.

Carrot Cake

Carrot Cake

It’s came! It finally came!  The recipe you’ve all been patiently waiting for (I’m looking at you, Later Levels).  Since I had a little more time with this recipe I decided to experiment a bit and go a little different route than your traditional “carrot cake”.  Most carrot cake, at least in the U.S. is more of a quick bread than a cake – it’s dense and crumby, though still good.  Instead I combined a few different recipes I found and made a much more light, airy crumb texture, that had plenty of height and reminded me much more of an actual cake.  But, by doing this, I made it a bit more complicated.  So bear with me and let’s dig in!

Carrot Cakecarrot cake difficulty and time

Carrot Cake ingredients

Start by mixing together the flour, salt, baking powder, baking soda, and cinnamon, and most of the sugar.  Put it in a bowl, use a whisk, and get it nice and evenly aerated and blended.  Oh, and make sure you pull out the eggs.  You’ll want them to sit at room temperature for at least 20 minutes before you whip them.

Grate the carrot using a fine grater.  It’ll take about 4-5 large carrots to get enough for this cake.  That seems like a lot, but can you imagine a better way to eat your veggies?  I usually don’t peel my carrots.  I feel like the skin has the potential for being good for you and is not, at the very least, not bad for you.  And it saves you that extra few minutes in time and clean up.  Win-win.  And, because we aren’t using Endura carrots, anything that shortens the time is worth it. When the carrots are ready slightly squeeze handfulls of them over a sink to get a little of the juice out. This will help keep it from falling to the bottom of the pan and from letting the cake be too wet.

whipped eggNow here comes the different part and the reason this isn’t an “easy” recipe.  Add all the eggs to a bowl and whip on high, using a whisk or electric mixer fitted with a whisk attachment, until they start to get bubbly.  Stop and add the rest of the sugar and all the oil, and continue whisking until the eggs get light in color, start to get fluffy, and can almost double in volume.  This will take at least 5 minutes.  If you’re lucky enough to have a stand mixer like a KitchenAid you can do this while grating the carrots and save yourself even more time!

All three bowls of mixture

Once the eggs are ready slowly fold in the carrots.  This mixture will be really thick and you’ll wonder why on earth we spent all that time whipping eggs, but trust me.  It’s worth it.  Slowly add the flour mixture and stir until just combined.


Butter a cake panButter a 10 inch round cake pan, making sure you get all the cracks and crannies.  I prefer a springform pan because they are the easiest to get a cake out of.  If you don’t use a springform you may have to flour the pan as well as butter it.  Just throw in some flour after you grease it, shake it until the butter is covered, and dump out the excess.  It’s pretty easy.  Add the cake batter and stick it in the oven.  The entire bake process is an adventure, like completing a shrine.  Depending on the oven, the type of oven, how old your oven is, etc… your baking time will be different from someone else’s.  But my oven bake time was about 45 minutes.  Yours will be pretty close to this, but just watch starting around 40 minutes.  Getting a perfectly domed cake is all about timing.  Take the cake out to early (or even check on it too early) and the whole thing will collapse on you.  Take the cake out late and it’ll be so dry you’ll regret eating it.  So if you open the oven door to check on the cake and the center wobbles a bit close it quick and wait another 5-10 minutes before you even try again.  A toothpick inserted into the center will come out clean when it’s ready!

While the cake is baking feel free to make some good, old fashioned cream cheese frosting.  Make sure the butter and cream cheese is at room temperature and add them to a bowl with the vanilla (again, a stand mixer comes in really handy right about now).  Beat them together until they are well combined.  If you use a stand mixer make sure you scrape the bowl at this point with a spatula.  Add the powdered sugar 2/3 cup at a time until it becomes spreadable.  How much powdered sugar you add is really up to your taste preferences.  I prefer a more sharp, tangy frosting (if I eat it at all) so I was good at 2 cups.

When the cake is done take it out of the oven and allow it to cool completely before frosting.  I take the springform sides off after about 5 minutes so it doesn’t keep cooking.  If you use a regular round cake pan take it out of the pan after 5-10 minutes and let it cool on a wire rack.  This will prevent the bottom from getting soggy.  No one wants a soggy bottom.

Make sure you wait until the cake has cooled completely before you frost. If you don’t the entire top layer will peel away into the frosting and become a big, giant mess. When cooled, frost and enjoy!  Oh, and I don’t recommend garnishing with a raw carrot.  But I won’t judge if you do…

Close up of carrot cake

Link’s Carrot Cake recipe:

    • Any Carrot
    • Tabantha Wheat
    • Cane Sugar
    • Goat Butter

Carrot Cake

  • Servings: 1 10 inch cake
  • Difficulty: moderate
  • Print

Carrot Cake with Cream Cheese Frosting from Breath of the Wild

Carrot

  • 4 eggs
  • 2 cups flour
  • 2 cups sugar
  • 2 teaspoons baking powder
  • 1 teaspoon ground cinnamon
  • 1/2 teaspoon salt
  • 1/2 teaspoon baking soda
  • 3 cups finely shredded carrot (about 4-5 large carrots)
  • 3/4 cup cooking oil

Frosting

  • 4 oz cream cheese
  • 1/4 cup butter
  • 1 teaspoon vanilla
  • 2-3 cups powdered sugar

Directions

  1. Preheat oven to 350°F
  2. Whisk together flour, 1 1/2 cups sugar, baking powder, baking soda, cinnamon, and salt together until aerated and combined
  3. Shred carrot with a fine grater. There is no need to peel beforehand but you may if you desire.
  4. Slightly squeeze handfulls of carrot to remove excess moisture.
  5. Using a stand mixer or electric mixer fitted with a whisk attachment whip eggs together until frothy. Slowly add the oil and remaining 1/2 cup sugar and whip together until light in color, fluffy, and almost double in volume.
  6. Gently fold carrots into the egg mixture. Be careful not to deflate the eggs.
  7. Slowly add and stir in flour mixture until just combined.
  8. Butter and, if not using a springform pan, flour a 10 inch round cake pan. Make sure the butter gets in all the cracks. If you need to flour the pan add a handful of flour and knock the pan in circles until it’s covered in flour after buttering. Dump out excess flour.
  9. Add cake batter to the pan and use a spatula to smooth down and even the surface.
  10. Bake for about 45 minutes. The cake will be done when a toothpick comes out clean.
  11. Make the frosting while the cake is baking by adding the butter, cream cheese, and vanilla to a mixer or bowl.
  12. Mix until combined and slowly add powdered sugar, 2/3 cup at a time, until you reach a spreadable consistency and desired flavor. This, for me, is 2 cups powdered sugar.
  13. When the cake has cooled for 5-10 minutes remove from the pan and allow to finish cooling.
  14. Frost and serve! This cake will store well at room temperature for a few days tightly covered.

It’s Poll Day Again!

It’s poll day and I’m not cancelling!  Things are finally calming down around the house – our stove and oven are fixed (the motherboard fried the first time we tried to use the oven), we are down to 3 rooms that remain mostly unpacked, and the rest of the unpacking is finally leaving us room to do things like walk around.  So, without further ado, lets see what everyone wants for next week’s recipe!

Salt Grilled Prime Meat

Salt Grilled Prime Meat

Thank you all for you patience as I sort through the latest episode of “Extreme Home-Ownership”.  This last one, if you missed my live-tweet recipe extravaganza, involved a fried motherboard on our brand new range the first time we used the oven.  Apparently it’s an incredibly busy week in the appliance warranty repair business this week because the earliest they can come fix it is Friday.  Which is the worst for a cook/baker like myself.  I’ve definitely learned all the weird work-arounds like cooking pasta in a rice cooker (it turns out mushy… I don’t recommend it) and the benefits of an electric fry pan (thank you parents for that one).  But come Friday we should be back in business!

In the meantime I tried a new thing!  I did a live-tweet of this Salt Grilled Prime Meat recipe.  And yes, I know on twitter I called it a live-twitter.  I’m still new to the social media game – an embarrassing thing to admit for a 20-something like myself.  There were a few people who stuck around and checked it out.  Did any of you blog followers think this was cool?  Is it something you’d be interested in seeing again?  Or, instead of live-tweets, would you rather see a twitch stream showing the entire process start to finish?  I’ve been thinking about starting one and maybe the comments on this post will help me finally make up my mind on the matter!  But now, without further delay, here’s the reason you came to my blog today:

Salt Grilled Prime MeatSalt Grilled Prime Meat Difficulty and Time

We start with purchasing the meat.  After a lengthy discussion with the butcher yesterday I finally learned that prime meat is, indeed, a thing.  Apparently there are 4 major types of meat – Select, Choice, Prime, and Prime Aged (least to best from left to right).  As you would expect the higher the quality the higher the price, with this particular butcher charging about $20.00 a pound for prime New York strip steak.  I had him cut 1 inch thick steaks for me and 4 cost about $40.00 total – a very pricy sum for a single part of a single meal.  It’s definitely something to save for special occasions!

Salt Grilled Prime Meat Ingredients

We start by taking the meat out to warm to room temperature about 30 minutes before cooking.  As I mentioned in my Meat and Rice Bowl recipe it makes a huge difference in the evenness and the time it takes to cook if you do this!  Make sure you keep it covered – as a microbiologist I promise you don’t want flies on your food!

With about 10 minutes until grill time heat your grill. I have a charcoal grill so this recipe is how to work with charcoal.  If you have a gas grill I think you’d want the setting at about medium-high.  You’ll have to play with it a bit to be sure…  If you are lucky enough to have a charcoal grill, like I do, start your briquettes.  I use Kingsford Match Light.  I have found they are the easiest and best quality – it’s what my dad, the master griller, uses.  Stack the briquettes in a pyramid and light in several places.  Leave them to burn and turn ashy for about 10 minutes.

When the coals are almost ready pat the steaks down with a paper towel to remove the excess liquid.  This is especially needed if the steaks were frozen and have been thawed.  Brush the steaks lightly with olive oil and season generously with kosher salt and pepper.  We use kosher salt because the large crystals make for a better flavor.  Using ground salt makes it much more difficult to control the quantity and taste of the salt on the steak.

Lay the steaks perpendicular to the grillOnce the coals are ashy spread them out along the bottom of the grill until they are evenly distributed.  Lay the steaks cross-ways along the grill – you want really pretty sear marks and it provides the best support for your steaks.  Cover your grill and allow to cook for 5-7 minutes, depending on the heat of the grill and thickness of the steaks.

Before they start to look cooked on both sides turn the steaks over.  Cover and cook another 5-7 minutes, depending on how well done you’d like them.  Remove them from the grill and leave the cover off to allow the coals to burn out faster.


steaks smoking on a grill

Place the steaks immediately on a plate and cover with foil to let them rest.  This rest period is very important – it allows the juices to equilibrate so they don’t ooze out the steak the minute you cut into it.  It makes for a more tender, juicy bite!

Garnish and serve just the way it is – if you did it right it’ll be delicious!  And trust me, if you do splurge and get prime meat, it’ll be the best steak you’ve had in a long time!

steak on a plate

Link’s Meat and Rice Bowl

    • Any raw prime meat or bird thigh
    • Rock salt

Salt Grilled Prime Meat

  • Servings: 4
  • Difficulty: moderately easy
  • Print

Prime New York Strip steak charcoal-grilled with salt and pepper


Ingredients

  • 4 Prime New York strip steaks, about 1 inch thick
  • 1-2 tablespoons kosher salt
  • 1-2 teaspoons pepper
  • 2-3 tablespoons oil
  • 40 or so Kingsford Match Light briquettes (This quantity is based on the size of my grill. You may need more or less based on yours.)

Directions

  1. Warm the steaks to room temperature.
  2. 10 minutes before cooking your steaks build a pyramid of briquettes in your grill. Light them in multiple places and allow to burn until ashy.
  3. Dry your steaks with a paper towel, especially if they were previously frozen.
  4. Brush the steaks lightly with olive oil and generously spread kosher salt and pepper. Gently rub this in to the steaks.
  5. When the briquettes are ashy and grey, but still hot, this means they are ready. Spread them evenly across the bottom of the grill and replace the grill top.
  6. Add the steaks perpendicular or at an angle to the grill lines. Don’t place them parallel because this won’t give your steaks the support they need.
  7. Cover the grill and allow to cook for 5-7 minutes. This time is dependent on several factors, including the heat outside, retention of heat in the grill, and thickness of the steaks. Keep an eye on them so they don’t overcook!
  8. Before they steaks look cooked on both sides flip them, cover, and cook for another 5-7 minutes. This time will be determined again, by lots of factors, including how well done you’d like them.
  9. Remove from the grill and cover with foil. Allow the steaks to rest for at least 5-7 minutes. This will allow the juices to equilibrate and will make your steak more juicy.
  10. Serve with whatever you’d like but enjoy these steaks just as they are! You won’t regret it.

Monday’s Poll has (yet again) been cancelled – and a surprise for tomorrow’s recipe!

Bad news, folks.  Monday’s poll has once again been cancelled.  This is due to some very unexpected, unappreciated, and unbelievable events happening over at my brand new house yesterday… I’ll tell you all about it tomorrow.  P.S. – they aren’t good.  This has made it impossible for me to hold to my last poll and make carrot cake tomorrow… I’m so sorry!  Especially for those of you who have been waiting weeks for this!

Since I haven’t had the capability to cook/bake for the last 2 days I am going to try something new tomorrow!  Over at Instagram and Twitter, starting tomorrow morning-ish, I will be live-posting a recipe for Salt Grilled Prime Meat!  I’ll start with why I can’t post what I meant to create, show you how to shop and choose a good cut of prime steak, and walk you through all the steps to grill your own perfectly seasoned and grilled steak, all in time for Independence Day here in the U.S.!  So if you haven’t already head over to @sheikahplate and follow to get photos and a live feed of the recipe.  If you feel so inclined follow along!  It’ll make the perfect meal to enjoy with fireworks… or your favorite form of random, middle of the week, not a holiday – not my country, entertainment!

See you all tomorrow!  I’m pretty excited!

P.S. – the full recipe and photos will be posted on the blog Wednesday for those of you who can’t follow tomorrow.  But come on, you want to be there.  It’ll be awesome!

To Cook or Not to Cook

Dear loyal readers… and readers who have just found my blog – today’s recipe has been cancelled.

And not because I didn’t want to make it!  It’s because we finally got Bolson and Co. to step in, take over the construction on our home, and finish the job! So we spent the entire weekend moving, unpacking, and cleaning and I just simply wasn’t able to do it.  I don’t even have counter space to take photos at the moment since everything is still boxed up.

So the carrot cake, which technically tied with apple pie but someone wrote in and requested carrot cake so I gave it an extra vote, is pushed back to next week.  I promise to be unpacked and ready to go by then!  Thanks for all your understanding!

A Girl in a Game Store

A Girl in a Game Store

As a female in the gaming world I have come across some weird behaviors over the years.  But very few compare to the different ways guys react to me when they see me in a game store alone.  Bordering on insulting, these hilarious run-ins prompted me to make a list of 5 navigational pitfalls that easily ruin a first impression.

The One-Upping Competition:

This one is so hard to avoid.  The guy wants to prove he knows more than the girl because of a, b, and c.  The girl wants to prove she knows the most because of x, y, and z.  Instead of interacting with each other and creating a bond that could be the start of a beautiful friendship they wind up arguing.  It goes from friendly banter to nit-picking in a heartbeat.  And the last place you want a relationship to start is with a fight.  Turn of vs. mode and play team mode for a while.  I bet you’ll like where it leads.

The Game Developer Stratagem:

Once Upon A Time I was waiting in line outside a GameStop with my little brother for the Nintendo Switch release.  It was now about 7 am and this girl shows up.  She stood at the front of the crowd of (mostly) men and said “I’m a game developer and I’d really love everyone’s opinions about what makes a good story”.  She batted her eyelashes, whipped her hair (probably…) and it worked – the first 10 boys or so fawned over her.  That is, until her boyfriend showed up and ruined the illusion that they might actually have a chance with her.  Every time I see this technique get used all I can think of is “Are you peacocking?  Really?  Do you think that’s gonna work?”.  People, get real.  Stop actively looking for attention and just be honest about what you really want.  I’m guessing people will appreciate it a lot more since they will, inevitably, find out the truth.

The Better Gamer Attempt:

Why is it that so many guys in a game store think that I need help playing my game?  Why do they feel compelled to give me hints even after I firmly state that I don’t want any help?  It’s because I’m a girl.  Because they want to impress the opposite sex with their “obvious” superiority and knowledge.  This method is, above almost all others, the most annoying because I don’t like spoilers!  And I’m guessing most people feel the same way.  So just stop it!  If there’s a girl (or guy, for that matter.  I’m sure it goes both ways) in a game store by herself who doesn’t look lost, she probably knows what she’s doing.  And instead of treating her like she’s clueless try engaging her in genuine equal conversation.  It’ll probably get you way further than assuming you know more than she does.

The Gawk and Cover:

Ha!  I love this one.  Not for use, mind you, since it doesn’t work at all, but because of how funny it is.  It’s so awkward to be wandering around the game store and see the one guy/girl following you with their eyes but ducking out of sight whenever you notice.  Fellow gamers, have a little more confidence in yourself!  Make Link your spirit animal and channel the triforce of courage!  Try and talk to them because the worst they can do is say no and if you don’t talk to them you’ll never know.  The unapproachable She/He will probably be more interested in your well-informed and interesting game opinions than they are about whatever it is that bothers you about yourself.  And if they aren’t trust me when I say they are flattered by the attention whether they go for it or not.  I always am!

The Damsel in Distress:

Ugh.  This strategy.  Just walk into any game store and you can see this method being utilized.  “Oh help me!  I don’t know anything and I’d love some big, strong man to figure it out for me”… Here’s the reason this method isn’t worth the attempt.  There are two reasons why a girl is in a game store: A) she’s married to/dating a gamer, isn’t a gamer herself, and is genuinely looking for help.  She isn’t sure what she needs or how to find it but dudes, she’s taken.  And B) she’s just looking for attention but trust me, she knows as much as you or more and you’ll get a rude awakening when you find out she faked it.  Women of the world, instead of trying to mask how much we really know and how much we love gaming, why don’t we own it and approach these gentlemen as equals instead of inferior beings.  It’ll probably get you farther in a relationship because you’ll actually have something to build on rather than something to hide.

What awkward encounters have you guys encountered in the wild?  Did I miss any that you’ve experienced?


Meat and Rice Bowl

Meat and Rice Bowl

While the basics for this recipe are fairly straight-forward it had so much potential for embellishment that I’ve been chomping at the bit to make this one.  I decided to spice up Link’s recipe by adding a delicious garlic ginger sauce.  I’ve never used fish sauce before so when I found this recipe I was really unsure.  But with a little tweaking I was able to get something that I really loved.  And it made my house smell amazing for days.

Meat and Rice BowlDifficulty and Time Meter

This is the regular old meat and rice bowl so I decided to use sirloin, the easiest and, generally speaking, least expensive cut of steak.  But just because it’s less expensive and less tricky doesn’t mean it’s any less delicious when done right.  Pan-seared is the easiest and also my new favorite way to cook a steak and it lets me use my cast iron a lot more.   Let the steak come to room temperature – it sears a lot easier and cooks more evenly that way.

Meat and rice Bowl Ingredients

Amount of Water To Add to Rice
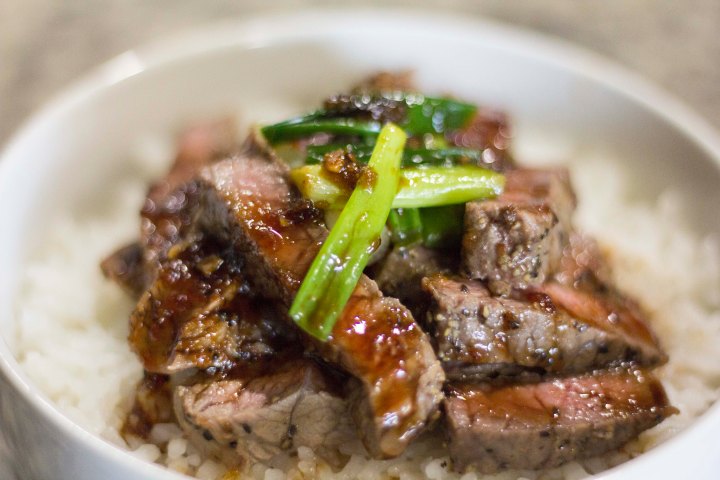
Start the rice while the steak is warming up.  It’ll take the longest to cook and you want it to be ready and hot when your steak is done!  Definitely only use traditional Asian sticky rice.  I only use sticky rice exclusively for everything because it’s legitimately the only rice worth knowing.  I use Calrose Botan rice, but you can use any sticky rice in your market.  If you choose to use a rice cooker a nice trick to using sticky rice is to wash it several times before you cook it.  Rinse it under warm water, drain the water, and repeat until the drained water starts to look a little more clear.  Add water to the rice cooker until it comes up to the first knuckle joint of your index finger when your finger is resting on top of the rice… does that make sense?  If not, here’s a photo:

While everything else is cooking/getting ready to cook start chopping the other ingredients.  Using frozen ginger seriously makes it 1,000% easier to work so just pop the ginger in the freezer about an hour before you want to use it and it’ll be ready to go!  Mince the garlic, measure out the sauces, and grate the ginger using a zester (best option) or the small side of a cheese grater (good enough option).  Cut the green onions into 3/4-1 inch pieces and make sure the slab of butter is ready and you’re all set!

When the steak isn’t cold use a paper towel to dry the steak as much as you can and then rub it with rock salt and pepper.  Drying the steak is a great trick to making it sear much better.  Trust me, it’s worth the extra effort.

Add all the ingredients for the sauce to a pot, whisk thoroughly, and bring to a boil.  Lower the heat to simmer for about 5-7 minutes.  At this point you can start cooking the steak if you feel comfortable.  Otherwise let the sauce thicken and blend and remove from the heat.  We will heat it back up after the steak is done.

While the steak is marinating for a minute in the salt and pepper, heat up the pan until piping hot (this is where the cast iron comes in handy).  When it’s ready add a little oil, but really, make sure it’s just enough to barely coat the bottom of the pan!  We don’t want our steaks swimming in oil.  It’ll ruin the beautiful sear.  Add the steak to the pan, laying it down away from you to prevent any oil splashes and painful burns.

Meat_&_Rice_Bowl_11

After the steak has seared for a minute or two turn the steak to caramelize the fat by placing them fat-side-down in the pan for a minute or two.  Then swap to all the other sides, following the same protocol of searing, turning, searing.  Finally lay the steak down flat on the last raw side and let it sear for a few minutes.  The remainder of cooking the steak is based on several factors: 1) how thick your steak is and 2) how well done you want it.  If your steaks are on the thinner side or you want your steak a little more raw you may be ready to spoon on the butter at this point.  If your steaks are thick or you like them well-done alternate cooking them on each of their flat sides until they are medium rare to medium.  Add the butter and onions all at once and start spooning the melted butter and cooking onions over the steak.  When the steaks are medium (or cooked to your preference, I just prefer medium!) remove them from the pan, cover with foil, and let rest for a few minutes.  Continue cooking the onions in the butter until they are done and remove them from the heat.

Phew. Take a deep breath, you’ve finished the most nerve-wracking part of the recipe!  Take it a little easy for a minute and, while the steaks are resting, quickly re-heat the sauce.  When you slice the steak slice it against the grain.  It’ll make a smoother, easier, and much more aesthetically pleasing cut!  Spoon out the rice into a bowl, add the steak, drizzle on the sauce, and enjoy!

Close up of Meat and Rice Bowl

Link’s Meat and Rice Bowl

    • Any raw meat or bird drumstick
    • Rock salt
    • Hylian rice

Meat and Rice Bowl

  • Servings: 4
  • Difficulty: moderate
  • Print

Sirloin steak with sticky rice and a garlic ginger sauce

Recipe adapted from Garlic-Ginger Flank Steak by Judy Kim on delish.com

Steak

  • 4 Sirloin steaks, warmed to room temperature
  • 2-3 Green onions, sliced into 1 inch pieces
  • 1-2 tablespoons rock or kosher salt
  • 1-2 teaspoons pepper
  • 1 tablespoon oil
  • 1-2 tablespoons butter
  • 2-3 cups sticky rice
  • Enough hot water to cover the rice

Sauce

  • 1/2 cup brown sugar
  • 2 tablespoons grated ginger
  • 3 medium garlic cloves, minced
  • 1/3 cup soy sauce
  • 1 1/2 tablespoon fish sauce
  • 1 1/2 tablespoon white vinegar

Directions

  1. Start cooking the rice
  2. Dry the steaks with a paper towel and rub with the rock salt and pepper until well coated.
  3. Add all the sauce ingredients to a sauce pan, whisk thoroughly, and bring to a boil. Reduce heat and allow to simmer 5-7 minutes until thickened.
  4. Heat the cast iron pan until piping hot. Add the oil and then add the steaks to the pan, laying it down away from you to prevent any oil splashes.
  5. Allow the steak to sear for a minute or two and then turn the steak on it’s side, fat side down. Allow the steak to sear until the fat is caramelized.
  6. Repeat step 5 on all sides until the steak is completely seared.
  7. If the steak needs more time to cooks due to thickness or how you’d like it cooked, continue turning the steak every few minutes until it is nearly done.
  8. When the steak is nearing completion add the butter and green onions to the pan. Spoon the melted butter over the steaks until they are the appropriate temperature.
  9. Remove the steaks from the pan and cover with foil to let them rest.
  10. Continue cooking the onions until wilted and then remove them from the pan.
  11. Slice the steak into strips against the grain and serve over rice. Drizzle the sauce over the steak and rice and enjoy!