Carrot Cake

Carrot Cake

It’s came! It finally came!  The recipe you’ve all been patiently waiting for (I’m looking at you, Later Levels).  Since I had a little more time with this recipe I decided to experiment a bit and go a little different route than your traditional “carrot cake”.  Most carrot cake, at least in the U.S. is more of a quick bread than a cake – it’s dense and crumby, though still good.  Instead I combined a few different recipes I found and made a much more light, airy crumb texture, that had plenty of height and reminded me much more of an actual cake.  But, by doing this, I made it a bit more complicated.  So bear with me and let’s dig in!

Carrot Cakecarrot cake difficulty and time

Carrot Cake ingredients

Start by mixing together the flour, salt, baking powder, baking soda, and cinnamon, and most of the sugar.  Put it in a bowl, use a whisk, and get it nice and evenly aerated and blended.  Oh, and make sure you pull out the eggs.  You’ll want them to sit at room temperature for at least 20 minutes before you whip them.

Grate the carrot using a fine grater.  It’ll take about 4-5 large carrots to get enough for this cake.  That seems like a lot, but can you imagine a better way to eat your veggies?  I usually don’t peel my carrots.  I feel like the skin has the potential for being good for you and is not, at the very least, not bad for you.  And it saves you that extra few minutes in time and clean up.  Win-win.  And, because we aren’t using Endura carrots, anything that shortens the time is worth it. When the carrots are ready slightly squeeze handfulls of them over a sink to get a little of the juice out. This will help keep it from falling to the bottom of the pan and from letting the cake be too wet.

whipped eggNow here comes the different part and the reason this isn’t an “easy” recipe.  Add all the eggs to a bowl and whip on high, using a whisk or electric mixer fitted with a whisk attachment, until they start to get bubbly.  Stop and add the rest of the sugar and all the oil, and continue whisking until the eggs get light in color, start to get fluffy, and can almost double in volume.  This will take at least 5 minutes.  If you’re lucky enough to have a stand mixer like a KitchenAid you can do this while grating the carrots and save yourself even more time!

All three bowls of mixture

Once the eggs are ready slowly fold in the carrots.  This mixture will be really thick and you’ll wonder why on earth we spent all that time whipping eggs, but trust me.  It’s worth it.  Slowly add the flour mixture and stir until just combined.


Butter a cake panButter a 10 inch round cake pan, making sure you get all the cracks and crannies.  I prefer a springform pan because they are the easiest to get a cake out of.  If you don’t use a springform you may have to flour the pan as well as butter it.  Just throw in some flour after you grease it, shake it until the butter is covered, and dump out the excess.  It’s pretty easy.  Add the cake batter and stick it in the oven.  The entire bake process is an adventure, like completing a shrine.  Depending on the oven, the type of oven, how old your oven is, etc… your baking time will be different from someone else’s.  But my oven bake time was about 45 minutes.  Yours will be pretty close to this, but just watch starting around 40 minutes.  Getting a perfectly domed cake is all about timing.  Take the cake out to early (or even check on it too early) and the whole thing will collapse on you.  Take the cake out late and it’ll be so dry you’ll regret eating it.  So if you open the oven door to check on the cake and the center wobbles a bit close it quick and wait another 5-10 minutes before you even try again.  A toothpick inserted into the center will come out clean when it’s ready!

While the cake is baking feel free to make some good, old fashioned cream cheese frosting.  Make sure the butter and cream cheese is at room temperature and add them to a bowl with the vanilla (again, a stand mixer comes in really handy right about now).  Beat them together until they are well combined.  If you use a stand mixer make sure you scrape the bowl at this point with a spatula.  Add the powdered sugar 2/3 cup at a time until it becomes spreadable.  How much powdered sugar you add is really up to your taste preferences.  I prefer a more sharp, tangy frosting (if I eat it at all) so I was good at 2 cups.

When the cake is done take it out of the oven and allow it to cool completely before frosting.  I take the springform sides off after about 5 minutes so it doesn’t keep cooking.  If you use a regular round cake pan take it out of the pan after 5-10 minutes and let it cool on a wire rack.  This will prevent the bottom from getting soggy.  No one wants a soggy bottom.

Make sure you wait until the cake has cooled completely before you frost. If you don’t the entire top layer will peel away into the frosting and become a big, giant mess. When cooled, frost and enjoy!  Oh, and I don’t recommend garnishing with a raw carrot.  But I won’t judge if you do…

Close up of carrot cake

Link’s Carrot Cake recipe:

    • Any Carrot
    • Tabantha Wheat
    • Cane Sugar
    • Goat Butter

Carrot Cake

  • Servings: 1 10 inch cake
  • Difficulty: moderate
  • Print

Carrot Cake with Cream Cheese Frosting from Breath of the Wild

Carrot

  • 4 eggs
  • 2 cups flour
  • 2 cups sugar
  • 2 teaspoons baking powder
  • 1 teaspoon ground cinnamon
  • 1/2 teaspoon salt
  • 1/2 teaspoon baking soda
  • 3 cups finely shredded carrot (about 4-5 large carrots)
  • 3/4 cup cooking oil

Frosting

  • 4 oz cream cheese
  • 1/4 cup butter
  • 1 teaspoon vanilla
  • 2-3 cups powdered sugar

Directions

  1. Preheat oven to 350°F
  2. Whisk together flour, 1 1/2 cups sugar, baking powder, baking soda, cinnamon, and salt together until aerated and combined
  3. Shred carrot with a fine grater. There is no need to peel beforehand but you may if you desire.
  4. Slightly squeeze handfulls of carrot to remove excess moisture.
  5. Using a stand mixer or electric mixer fitted with a whisk attachment whip eggs together until frothy. Slowly add the oil and remaining 1/2 cup sugar and whip together until light in color, fluffy, and almost double in volume.
  6. Gently fold carrots into the egg mixture. Be careful not to deflate the eggs.
  7. Slowly add and stir in flour mixture until just combined.
  8. Butter and, if not using a springform pan, flour a 10 inch round cake pan. Make sure the butter gets in all the cracks. If you need to flour the pan add a handful of flour and knock the pan in circles until it’s covered in flour after buttering. Dump out excess flour.
  9. Add cake batter to the pan and use a spatula to smooth down and even the surface.
  10. Bake for about 45 minutes. The cake will be done when a toothpick comes out clean.
  11. Make the frosting while the cake is baking by adding the butter, cream cheese, and vanilla to a mixer or bowl.
  12. Mix until combined and slowly add powdered sugar, 2/3 cup at a time, until you reach a spreadable consistency and desired flavor. This, for me, is 2 cups powdered sugar.
  13. When the cake has cooled for 5-10 minutes remove from the pan and allow to finish cooling.
  14. Frost and serve! This cake will store well at room temperature for a few days tightly covered.

Meat and Rice Bowl

Meat and Rice Bowl

While the basics for this recipe are fairly straight-forward it had so much potential for embellishment that I’ve been chomping at the bit to make this one.  I decided to spice up Link’s recipe by adding a delicious garlic ginger sauce.  I’ve never used fish sauce before so when I found this recipe I was really unsure.  But with a little tweaking I was able to get something that I really loved.  And it made my house smell amazing for days.

Meat and Rice BowlDifficulty and Time Meter

This is the regular old meat and rice bowl so I decided to use sirloin, the easiest and, generally speaking, least expensive cut of steak.  But just because it’s less expensive and less tricky doesn’t mean it’s any less delicious when done right.  Pan-seared is the easiest and also my new favorite way to cook a steak and it lets me use my cast iron a lot more.   Let the steak come to room temperature – it sears a lot easier and cooks more evenly that way.

Meat and rice Bowl Ingredients

Amount of Water To Add to Rice
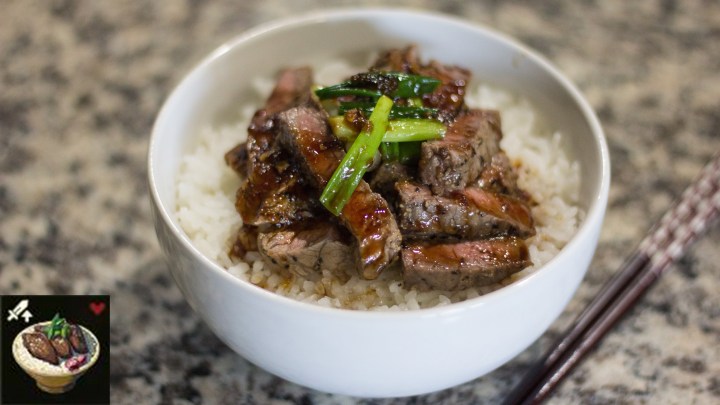
Start the rice while the steak is warming up.  It’ll take the longest to cook and you want it to be ready and hot when your steak is done!  Definitely only use traditional Asian sticky rice.  I only use sticky rice exclusively for everything because it’s legitimately the only rice worth knowing.  I use Calrose Botan rice, but you can use any sticky rice in your market.  If you choose to use a rice cooker a nice trick to using sticky rice is to wash it several times before you cook it.  Rinse it under warm water, drain the water, and repeat until the drained water starts to look a little more clear.  Add water to the rice cooker until it comes up to the first knuckle joint of your index finger when your finger is resting on top of the rice… does that make sense?  If not, here’s a photo:

While everything else is cooking/getting ready to cook start chopping the other ingredients.  Using frozen ginger seriously makes it 1,000% easier to work so just pop the ginger in the freezer about an hour before you want to use it and it’ll be ready to go!  Mince the garlic, measure out the sauces, and grate the ginger using a zester (best option) or the small side of a cheese grater (good enough option).  Cut the green onions into 3/4-1 inch pieces and make sure the slab of butter is ready and you’re all set!

When the steak isn’t cold use a paper towel to dry the steak as much as you can and then rub it with rock salt and pepper.  Drying the steak is a great trick to making it sear much better.  Trust me, it’s worth the extra effort.

Add all the ingredients for the sauce to a pot, whisk thoroughly, and bring to a boil.  Lower the heat to simmer for about 5-7 minutes.  At this point you can start cooking the steak if you feel comfortable.  Otherwise let the sauce thicken and blend and remove from the heat.  We will heat it back up after the steak is done.

While the steak is marinating for a minute in the salt and pepper, heat up the pan until piping hot (this is where the cast iron comes in handy).  When it’s ready add a little oil, but really, make sure it’s just enough to barely coat the bottom of the pan!  We don’t want our steaks swimming in oil.  It’ll ruin the beautiful sear.  Add the steak to the pan, laying it down away from you to prevent any oil splashes and painful burns.

Meat_&_Rice_Bowl_11

After the steak has seared for a minute or two turn the steak to caramelize the fat by placing them fat-side-down in the pan for a minute or two.  Then swap to all the other sides, following the same protocol of searing, turning, searing.  Finally lay the steak down flat on the last raw side and let it sear for a few minutes.  The remainder of cooking the steak is based on several factors: 1) how thick your steak is and 2) how well done you want it.  If your steaks are on the thinner side or you want your steak a little more raw you may be ready to spoon on the butter at this point.  If your steaks are thick or you like them well-done alternate cooking them on each of their flat sides until they are medium rare to medium.  Add the butter and onions all at once and start spooning the melted butter and cooking onions over the steak.  When the steaks are medium (or cooked to your preference, I just prefer medium!) remove them from the pan, cover with foil, and let rest for a few minutes.  Continue cooking the onions in the butter until they are done and remove them from the heat.

Phew. Take a deep breath, you’ve finished the most nerve-wracking part of the recipe!  Take it a little easy for a minute and, while the steaks are resting, quickly re-heat the sauce.  When you slice the steak slice it against the grain.  It’ll make a smoother, easier, and much more aesthetically pleasing cut!  Spoon out the rice into a bowl, add the steak, drizzle on the sauce, and enjoy!

Close up of Meat and Rice Bowl

Link’s Meat and Rice Bowl

    • Any raw meat or bird drumstick
    • Rock salt
    • Hylian rice

Meat and Rice Bowl

  • Servings: 4
  • Difficulty: moderate
  • Print

Sirloin steak with sticky rice and a garlic ginger sauce

Recipe adapted from Garlic-Ginger Flank Steak by Judy Kim on delish.com

Steak

  • 4 Sirloin steaks, warmed to room temperature
  • 2-3 Green onions, sliced into 1 inch pieces
  • 1-2 tablespoons rock or kosher salt
  • 1-2 teaspoons pepper
  • 1 tablespoon oil
  • 1-2 tablespoons butter
  • 2-3 cups sticky rice
  • Enough hot water to cover the rice

Sauce

  • 1/2 cup brown sugar
  • 2 tablespoons grated ginger
  • 3 medium garlic cloves, minced
  • 1/3 cup soy sauce
  • 1 1/2 tablespoon fish sauce
  • 1 1/2 tablespoon white vinegar

Directions

  1. Start cooking the rice
  2. Dry the steaks with a paper towel and rub with the rock salt and pepper until well coated.
  3. Add all the sauce ingredients to a sauce pan, whisk thoroughly, and bring to a boil. Reduce heat and allow to simmer 5-7 minutes until thickened.
  4. Heat the cast iron pan until piping hot. Add the oil and then add the steaks to the pan, laying it down away from you to prevent any oil splashes.
  5. Allow the steak to sear for a minute or two and then turn the steak on it’s side, fat side down. Allow the steak to sear until the fat is caramelized.
  6. Repeat step 5 on all sides until the steak is completely seared.
  7. If the steak needs more time to cooks due to thickness or how you’d like it cooked, continue turning the steak every few minutes until it is nearly done.
  8. When the steak is nearing completion add the butter and green onions to the pan. Spoon the melted butter over the steaks until they are the appropriate temperature.
  9. Remove the steaks from the pan and cover with foil to let them rest.
  10. Continue cooking the onions until wilted and then remove them from the pan.
  11. Slice the steak into strips against the grain and serve over rice. Drizzle the sauce over the steak and rice and enjoy!

Thursday Thoughts: E3 Edition

Thursday Thoughts: E3 Edition

With E3 slowly winding down and coming to a close I wanted to join the hundreds of people expressing their feelings on the turn out this year.  I know quite a few of my fellow gamer-bloggers have been live-blogging E3 this year.  I appreciate their stamina and insight, particularly because it allowed me to skip a lot of it due to other conflicts.  If you want a really good exploration of a lot of the showcases I highly recommend Adventure Rules.  His posts made me laugh and were pretty good at capturing the feel of the presentations.

Bethesda:  Let’s start with one I didn’t watch.  Thanks to Ian, my little brother, and my brother-in-law I got a pretty good idea of what happened.  It made me feel very lucky that I didn’t stay up for it… Nothing was announced that sparked my interest, including Skyrim for Switch, because, frankly, that guy stealing Link’s stuff was just weird to me.

Microsoft:  I don’t own an Xbox and I probably won’t ever own an Xbox.  But their overwhelming focus on something that’ll be difficult for people to afford utilizing technology hardly anyone can afford painted them into a serious corner.  So what if your console has 4K resolution?  Are you going to drop $500.00 on a new console only to play it on your TV that’s still 1080P?  In order for this truly to work you’ve got to spend the thousands on a new TV, and then buy the console, and then buy only the games that have 4K capability!  Am I impressed with the technology they presented?  Of course!  It’s a huge leap forward.  But do I honestly think it’s going to work out for them?  I think that’s an obvious no…  At least not right now.

Ubisoft:  I’m not an Assassin’s Creed fan.  I know the stories are pretty interesting, in general, but I think the gameplay is pretty boring.  I didn’t even like Black Flag despite the fact that you’re a pirate and pirate’s were in that year.  But an ancient Egyptian storyline has so much potential!  I think I’ll still feel the same way about the gameplay and, frankly, even with the coolest concepts Ubisoft hasn’t delivered on a storyline I care about.  But then there’s Mario + Rabbids.  It looked like a mixture of straight-up weird and cool.  I couldn’t tell what my feelings were on this one.  At first I pushed back, thinking it was something I would never play.  But the more I see of it, the more willing I am to give it a chance.  It’s a Mario game, after all.

EA:  Confession time: I love Star Wars.  When I went to my very first Comic Con and saw Dave Prowse I started crying because I was so overwhelmed.  He thought that was pretty cool and invited me and my family to dinner with him and Peter Mayhew.  Definitely worked out in my favor.  So when I see a newer and much, much better Battlefront coming, I get excited.  Nothing else really stood out, but Star Wars is always worth it for me.

PlayStation:  Every year my brother-in-law throws a PlayStation party where we gamers come together and watch the showcase.  This year we even had a game.  Each of us wrote down a list of games we thought they’d present and there was a point system and everything.  I don’t always play something other than Nintendo, but when I do, I play PlayStation (keep gaming, my friends), so I was pretty interested in what they’d be showing.  However, since I don’t play it very often, PlayStation would have to show something incredible to get me excited… But that didn’t happen.  I didn’t see anything that blew me away.  Even the new Uncharted, a series I actually love, didn’t appeal because I really don’t like Chloe!  What surprised me, though, was how little the people around me cared.  All the games we had guessed and games we were excited for weren’t discussed and the gameplay didn’t wow.  Though I admit, the zombear was pretty awesome.  Luckily they closed with Spider-man, which has some serious potential for making the Arkham fanbase happy.

Nintendo:  Now for the cream!  I don’t know what I was expecting from this but it wasn’t what we got.  Other than the weird voice-over for Xenoblade 2 (seriously, what was that?), they blew me away with their animation, titles, color, and excitement.  A new Pokemon RPG, a new Metroid, the Breath of the Wild DLC, a new Kirby, an amazing-looking Yoshi, followed up with Super Mario Odyssey.  It was like eye candy and happiness had a baby.  I’m so excited for nearly every single thing they announced and now I’m anxious for it all to get released!  I’m so excited for these games it feels like I’m a kid again.

So who, in my opinion, “won” E3?  I think that’s not really a fair question.  Everyone has different tastes, opinions, and ideas about what they want from their gaming experience.  I am a pretty exclusive Nintendo gamer so Microsoft (obviously) didn’t appeal to me and, while I enjoy PlayStation games and the stories they tell I wasn’t wowed by anything they brought to the table this year.  So it’s pretty fair to say Nintendo, with their colors, graphics, lack of mindless intro’s, and announcements of some new heavy hitters was my absolute favorite.  But it was last year, too, when the only thing they talked about was Breath of the Wild.  I think, based on preferences determined by a quick poll at my laboratory of all the serious gamers there, everyone got pretty excited about something someone was releasing.  Which means that, to me, E3 itself was the winner, bringing another year of excellent games to excellent platforms that appeal to a wide audience of gamers.

So what did you guys think?  Any games you’re super excited to play?

Mushroom Risotto

Mushroom Risotto

I tried making risotto once.  It did not turn out.  So why did I decide to tackle something that was this intimidating this early on?  Come on, guys.  It’s obvious.  I’m a gamer and gamer’s do not give up and do not take the easy road when it comes to conquering a difficult challenge.  How many of you have come across a puzzle that was difficult and said to yourself “Nah.  It’s too hard.  I’ll just pretend like this side quest doesn’t exist and that’ll be just fine”?  The answer is none of you.  Guys, we are the ones who stick with it to the end.  The completionists.  The puzzle-solving-it’s-2-AM-because-once-more-will-do-the-trick kind of people.  And that’s why I attempted this terrifying food so early on.  Why not chalk up the win from the get-go?  And with this recipe I found it was definitely worth it.

Mushroom RisottoDifficulty and Time for this recipe

A few pointers before we begin:

  • Risotto should never be made in a regular pan.  A heavy-bottom pot or enameled cast-iron pan are really the best.  They keep a hot temperature that isn’t easily changed by adding liquids.
  • I cannot say this strongly enough: once you start stirring your rice you can. not. stop.  If you stop the rice will burn to the bottom, human sacrifice, dogs and cats living together, mass hysteria!
  • You must use Italian rice.  It has a special type of starch that allows the rice to stick together, unlike any other kind of rice.  The best (according to one author) are: Arborio, Vialone Nano, and Carnaroli.  I use Arborio, myself
  • Musrooms are versatile but you definitely want some with flavor.  I used portobellini’s for this recipe but other options could be portabella’s, porcini, or shiitakes.

Ingredients for Mushroom Risotto

Now that the rules are over with, we start with the prep work.  Once you start cooking your Risotto you can’t, and I do mean that (see warning above), stop stirring it.  So keep everything nice and handy and ready to throw in the pot.  Start with getting your diluted vegetable  broth simmering.  It needs to stay at a slow simmer the entire time you make your risotto.  Then fine dice onion, large dice mushrooms and get them soaking, grate Parmesan cheese, cut 2 tablespoons butter and separate into 1 tablespoon pats, measure out your vegetable oil, and ready your salt and pepper.

Adding the Rice to the potHeat up your nice, heavy pan and add the oil and butter.  Cook the onion until it’s nice and tender and get ready for the fun/exciting/scary/hot part: the rice.

Add all the rice, stir it around until every grain is coated in the butter mixture, and start adding your broth 1/2 cup at a time.  I found that using a ladle was perfect for this.  It was easy to keep in my left hand while my right stirred like crazy to keep the risotto from sticking.  I made sure my set up was broth on the left, risotto on the right.  But feel free to switch it up!  We don’t discriminate against lefty’s here.

The broth and risotto set up

Stir and scrape the bottom of the pan until all the liquid has been absorbed and then add a second ladleful of broth.  Keep stirring and keep repeating until it’s been 10 minutes.  At this point, when you would add more broth, instead add the mushrooms and soak water.  When that liquid is evaporated and absorbed add more broth.  Continue until the rice is tender but still has a bite.  Some like it crunchy in the center.  Mine was definitely not crunchy but you don’t want it soft.  It’ll go mushy if your rice isn’t still al dente.

Adding butter and Parmesan cheese to the risotto

Add Parmesan cheese because it’s delicious, correct for salt and pepper, and enjoy while it’s hot!

Close texture of risotto

Link’s Mushroom Risotto recipe:

    • Hylian Rice
    • Goat Butter
    • Rock Salt
    • Any Mushroom

Mushroom Risotto

  • Servings: 4
  • Difficulty: moderate
  • Print

Mushroom Risotto with Parmesan cheese from Breath of the Wild


Adapted from Essentials of Italina Cooking by Marcella Hazan

ingredients

  • 5 total cups diluted vegetable broth, 2.5 cups broth + 2.5 cups water
  • 2 tablespoons butter
  • 2 tablespoons vegetable oil
  • 2 tablespoons onion, diced very fine
  • 2 cups Arborio rice (or other Italian rice-see note above)
  • 3 ounces Portabellini mushrooms (or other mushrooms-see note above), diced, soaking in 1/2 cup water
  • 1/2 cup Parmesan cheese
  • salt and pepper to taste

Directions

  1. Bring broth to a very slow, steady simmer on a burner near where you’ll be cooking the risotto.
  2. Heat your heavy-bottom pan on medium-high heat and add 1 tablespoon of butter and the vegetable oil.
  3. When the butter is melted add the onion and cook until it becomes translucent.
  4. Add all the rice and stir quickly and thoroughly until the grains are well coated.
  5. Add 1/2 cup of simmering broth and cook the rice, stirring constantly with a long wooden spoon or spatula until the liquid is gone. Make sure you wipe all the sides and bottom of the pan clean as you stir. You must never stop stirring and you must wipe the pot completely clean frequently or the rice will stick.
  6. When there is no more liquid in the pot, add another 1/2 cup of broth and stir as described in step 5. Continue to add broth and stir in this manner.
  7. When the rice has cooked for 10 minutes, add the mushrooms and water. Continue to stir until there is no more liquid.
  8. Finish cooking the rice with broth, or, if you have no more broth, with water. Cook the rice until it is tender, but firm to the bite, with no more liquid remaining in the pot. This will take anywhere from 18-25 minutes total.
  9. Off heat, add a few grindings of pepper, the remaining tablespoon of butter, and all the Parmesan cheese. Stir thoroughly until the cheese melts and clings to the rice. Taste and correct for salt. Transfer to a platter and serve promptly with additional grated cheese on the table.

Speedrunning and Distractions From It

img_4865

Once upon a time, during the Awesome Games Done Quick January event, my husband told me he watched someone speedrun Arkham City.  First of all, I had no idea what AGDQ was.  But more importantly, I had no idea what speedrunning was.

“What?! Speedrunning?” you say.  “But, Teri Mae, speedrunning has been around forever.  How could you possibly have not heard of it until January?  And not just any January, but January of 2017?!”  And maybe, you say to yourself, she’s just an exaggerator and she knew about it but had never looked into it.  To that I respond no, I had literally never heard of speedrunning until exactly 6 months ago.  How does a serious gamer go this long without knowing about something so integral and awesome as speedrunning, you may wonder?   I’m not really a social media kind of girl.  I wasn’t interested in Twitch and I was pretty limited to my online multi-player gaming.  And by limited I mean sometimes, when my husband has to go do something, I’ll take over his Uncharted or Battlefront match.  But other than that I stuck to what I knew and loved – Legend of Zelda and Mario.

But the idea of speedrunning opened up an entirely new and exciting vista of possibilities to me!  I decided to see how fast I could play my very favorite, Ocarina of Time.  After all, I thought, I am pretty good at Zelda games.  I have every puzzle memorized and had, what I thought at the time, a pretty good algorithm for time management.  So, without knowing anything about what actual speedrunning looks like, I timed myself playing it.  Wanna know what my time was?  8 hours, 29 minutes, 57 seconds.  I thought that was decent.  With only one major mistake while beating Ganondorf I was impressed with myself and I bragged to the only person who really knew what was going on, my little brother.  So he, in true little brother fashion, decided to break my heart and crush my soul.

He sent me a YouTube video of the twitch stream in which DannyB21892 makes his world record-breaking glitchless run.  3 hours something minutes (he has since broken that record so I’m unsure of the exact minutes).  I was stunned when I saw the time.  And then I started actually watching it.  I had no idea how much effort and thought had gone into figuring out work-arounds, precise paths, and which items to skip and which were necessary.  I learned that I was WAY out of my league.  But it just made me that much more determined to learn speedrunning.  To get into the muck and be the very best.  Like no one ever was.  Despite this new enthusiasm and wanting to dive in headfirst, I hesitated.

While I think it would be the coolest thing ever to beat every single glitchless OoT world record and be a serious contender to DannyB21892’s obvious dominance in that arena, I am nervous about playing my favorite game to the point where it becomes a bit passé.  I still loved taking my time and pausing to hear the music.  But the longer I think about it the more I realize that I don’t exactly enjoy wandering and exploring anymore.  Maybe speedrunning is the next step to leveling up my game.  And I still might do it.  Just not right now…  Because right when I had decided to make that commitment and jump in Breath of the Wild was released.

Now, I still maintain that OoT is my absolute favorite Zelda, but Breath of the Wild is stunning.  I have had WAY more fun playing that game than I originally anticipated.  I’ve always been a pretty thorough person so I explore every single new tower area 100% before I move on to the next one.  And the only quests I leave undone are the ones that require me to go to an unexplored area.  I’ve only been playing for about 210+ hours so I’ve only explored about 60% of the map.  The thing that just keeps blowing me away is that I have 250 korok seeds.  What am I missing that, having explored half the map, I don’t even have half the korok seeds possible?  How does that even work?  When the DLC releases the new mask am I really going to go back and re-explore every area to find them all?  You bet I am.  I even considered using the official guide to find them all but I’m an independent woman who wants to figure things out herself… while using perfectly legitimate add-ons like masks…

But back on topic.  Where were we anyway?  Oh, right!  Breath of the Wild and why I won’t start speedrunning until much later in the year.  Or maybe starting next year.  It’s really hard to find time to do much of anything when all you want to do is bake and play Breath of the Wild.  So will I be starting a speedrunning twitch?  Definitely.  Will it be soon?  Definitely not.  Will I probably start streaming Breath of the Wild and cooking tutorials for this blog?  More than likely.  Is that something people would be interested in?  I sure hope so!  Leave your comments below and let me know what you think.