
It’s beginning to feel a lot like Autumn
Everywhere you look
There’s some rain that is falling down
And leaves that are turning brown
And pumpkin spice and sweaters all around!
So after that are you still here? Yeah? Well I can’t help it! I love Autumn (or as we call it in the U.S. because American English is a pretty strange language, Fall) and it’s finally here! Everything is cooling off, the squash are starting to ripen, apples are falling, cinnamon and nutmeg are everywhere, and the smell of wet pavement is a dream! When things start to get chilly we naturally turn to deliciously warm food and spices to heat things up and what could possibly be better than fresh apple pie? I submit that nothing could be… unless you don’t like pie… like me…
Apple Pie

We start with a pie crust, technically called a short crust pastry. There are other kinds of pastry you could use but this is a traditional and well-established method. And since this was my very first apple pie ever, I thought we should go easy on ourselves.


Put some water into a cup and add a cube or two of ice. The colder the water, the better the pastry will turn out. Then let’s rub the cold butter into the flour until it resembles bread crumbs with some pea-sized chunks of butter left. You don’t want it too fine or you won’t get a nice flaky crust!
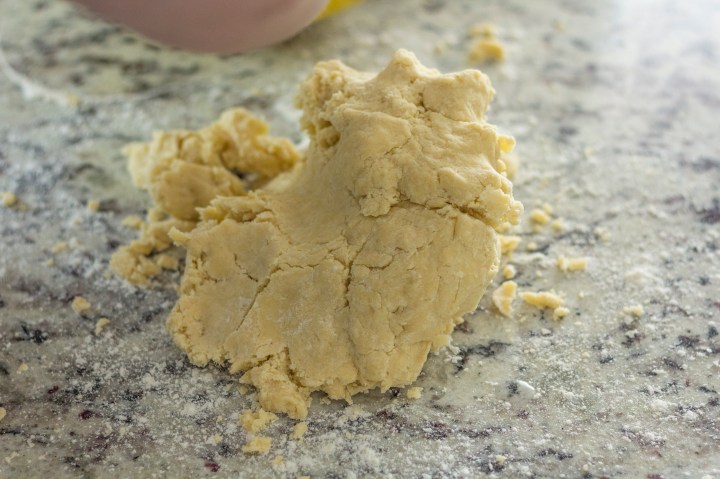
Now for the scary part. Once we start adding water we need to handle the dough as little as possible to get the best crust. Start with a few tablespoons, mix it in with your hands, add a few more, mix, lather, rinse, repeat until you’ve got a dough that sticks together well but isn’t too wet. It should be, as we say, a little shaggy, with some dried flour/butter bits still left over. See the photo if you have questions.
Lightly flour a surface and knead the dough together until it forms a cohesive mass. Again, don’t handle it too much or it’ll be stiff and tough. Split it so you have 1/3 and 2/3 in separate balls and wrap each in cling wrap. Refrigerate for a while so it relaxes and doesn’t get too tough.

Now let’s make the filling!
 Thinly slice the apples, making sure to remove the core. I like to leave the peel on for some added texture but if it bothers you, feel free to peel them as well. Then add all the apples to a bowl and add the flour, cinnamon, nutmeg, and brown sugar to the apples. Mix it around with your hands until all the apples are coated evenly and set aside. PS – this is a pretty standard pie filling recipe but I’ve switched out the regular white sugar for brown sugar. I’ve found it makes it a little more like caramel apples in flavor and I love it!


When the dough has chilled for about 15 minutes remove the smaller third from the fridge. Lightly flour a surface and roll it out into a round shape large enough to drape over the edges of the pie tin you are using. Don’t grease the tin or anything – there’s enough butter in the crust to take care of that for you! Remove the remaining 2/3 dough from the fridge, flour your surface, and roll it out into a rectangle at least the width of the pie tin and the longest you can. You want it as thin as you can get it because we are weaving this to match Link’s pie. If you wind up with bits that crack don’t worry, shortcrust is super forgiving. Just patch them up with some excess crust and roll over the top!

Once we have a nice rectangle cut the strips into 1 inch wide pieces. Lightly flour another surface and let’st start weaving! Lay out strips right next to each other the width of your pie tin. Take leftover strips and weave them, starting from the center, through the strips you’ve laid out. Over, under, over, under. Take another strip and weave it the opposite way, so you’re two strips are over/under opposite one another. Continue until you have a nice, even lattice. If you run out of strips, no worries. Just gather up any scraps and roll them out again. Cut from that and you should be golden. This crust recipe may be a little tight but it fit my 10 inch diameter pie tin just fine! And don’t weave this lattice too tightly – we need to have some space for air to escape so the pie doesn’t explode!


Lightly flour the bottom of the pie crust in the tin. This helps with the moisture and prevents you from incurring the wrath of Mary Berry and having a soggy bottom. Add all the apples to the crust. Don’t overfill the pie, we want it to be level with the top of the tin. If you’re left with extra you won’t regret just eating them. Promise.


Gently, using a combination of prayers, incantations, friend’s hands, and extra strong hopes, pick up your lattice somehow and lay it on top of the pie. If you are lucky enough to have a flat, large sheet you can slide under it, lay it on the pie, and slide out do that! If not, you’ll have to get some help. If it breaks a little, again, no worries! Just mash the pieces together and call it good.


Using a pinching technique between two fingers on one hand and a finger on the other, pinch the top and bottom layers of crust together. Trim the excess off the sides using a knife, brush the top of the pie with milk, and bake!
Check your pie about 40 minutes into the bake. If it’s starting to look too dark on top gently place a layer of tinfoil to the parts that are browning too quickly. This didn’t happen to me so I don’t have any photos. If it looks light and raw still you shouldn’t have a problem. Once it’s baked remove the pie from the oven and allow to cool in the tin for at least an hour before you eat it!

Link’s Apple Pie recipe:
-
-
- Apple or Wildberry
- Any fruit
- Tabantha Wheat
- Cane Sugar
-
Apple Pie
Homemade apple pie using fresh, tart apples
Pie
- 3 cups flour
- 1 cup cold butter, cut into tablespoons
- 1/2 teaspoon salt
- 6-9 tablespoons ice-cold water
Apple
- 2 1/2 pounds tart apples
- 1 teaspoon vanilla
- 1/8 teaspoon salt
- 1.5 tablespoons cornstarch
- 1/4 cup sugar
- 1 large egg
- 2 tablespoons butter
Directions
- Pre-heat the oven to 375°F and add some ice to a small cup of water.
- Add the flour and salt to a mixing bowl. Cut the butter into tablespoon-sized pieces. Add the butter to the flour and begin rubbing it between your fingers while adding flour. This will create a breadcrumb-like texture. Make sure you leave some butter pieces as large as peas.
- Handling the dough as little as possible, start adding water a few tablespoons at a time until the mixture begins to hold together. The dough will be a bit shaggy but should be mostly cohesive.
- Lightly flour a surface and knead the dough together until it forms a cohesive mass, being careful not to handle it too much.
- Split the dough so you have 1/3 and 2/3 in separate balls and wrap each in cling wrap. Refrigerate for 15 minutes.
- While the dough is chilling make the filling.
- Thinly slice the apples, making sure to remove the core. You may peel the apples or leave the skin on, but leaving the skin gives it a little more texture and color.
- Add all the apples to a bowl and add the flour, cinnamon, nutmeg, and brown sugar. Mix it with your hands until all the apples are coated evenly. Set this bowl aside aside.
- When the dough has chilled remove the smaller third from the fridge. Lightly flour a surface and roll it out into a round shape large enough to drape over the edges of the pie tin you are using. Do not grease the tin beforehand.
- Remove the remaining 2/3 dough from the fridge, flour your surface, and roll it out into a rectangle at least the width of the pie tin and the longest you can. You want it fairly thin because we will be weaving the top. If you wind up with bits that crack just patch them up with some excess crust and roll over the top.
- Cut the strips into 1 inch wide pieces. Lightly flour another surface to begin weaving.
- Lay out strips right next to each other the width of your pie tin. Take leftover strips and weave them, starting from the center, through the strips you’ve laid out by placing the strip over then under the next strip. Take another strip and weave it the opposite way, so you’re two strips are over/under opposite one another. Continue until you have a nice, even lattice. If you run out of strips simply gather up any scraps and roll them out again. Cut new strips to finish the lattice. Don’t weave this lattice too tightly – we need to have some space for air to escape so the pie doesn’t explode!
- Lightly flour the bottom of the pie crust in the tin. This helps with the moisture from the apples and keeps the crust crisp. Add all the apple mixture to the crust. Don’t overfill the pie, we want it to be level with the top of the tin.
- Gently pick up your lattice and lay it on top of the pie. If it breaks a little, again, no worries! Just mash the pieces together and call it good.
- Using a pinching technique between two fingers on one hand and a finger on the other, pinch the top and bottom layers of crust together. Trim any excess pie crust from the sides with a knife so it’s an even finish. Brush the top of the pie with milk and bake for 45-55 minutes or until golden brown.
- Check your pie about 40 minutes into the bake. If it’s starting to look too dark on top gently place a layer of tinfoil to the parts that are browning too quickly. Once it’s baked remove the pie from the oven and allow to cool in the tin for at least an hour before you eat it.
