I’ve been looking forward to introducing this new series for a long time! I was inspired by Victoria over at Pixelated Provisions, who started a series last year featuring each of the Overwatch League (OWL) teams as popsicles. Such a cool project, right?! Well I love OWL probably nearly as much as she does and I’ve been so excited to try and mimic her brilliant idea. But instead of something easy and awesome like popsicles, I decided to choose something complicated, but delicious! Every other Sunday through this season of OWL I’ll be posting a new team-inspired macaron! So let’s learn how to make macarons! By the way – if you don’t already follow Victoria, please go do that right now! She’s incredible, her food always looks divine, her plating is unbelievable, and she’s super nice to boot!

But first, let’s talk about the Boston Uprising. When I first heard there was going to be an Overwatch city-based league I was ecstatic. And then they announced there would be a team from Boston. Ever since I was a kid, I’ve been a Boston fan. My dad was a fan, which meant I was a fan – born and bred, live and die. So I knew the Uprising had to be my team. But stage one was so hard on my heart. They struggled, they lost, they, well, weren’t great. But I never stopped loving them, and by the end they proved to the world that they were a better team than you could have ever dreamed. They pushed through troubles and trials and came out with the only perfect stage and a place in the finals.
True to the Boston spirit, they are once again the underdogs in season 2. But as they’ve shown in the past, and proved on Thursday, they aren’t going anywhere but up. I’m so proud of those boys and all they work to accomplish. And I’m excited to continue to love them through this next season and the future! Boston UP!
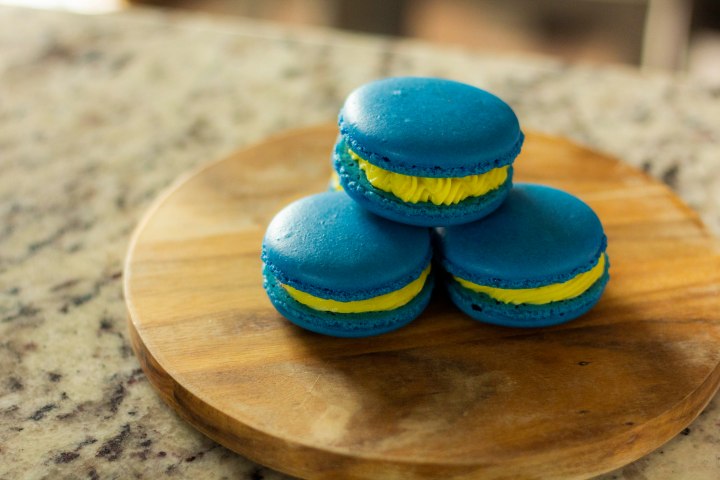
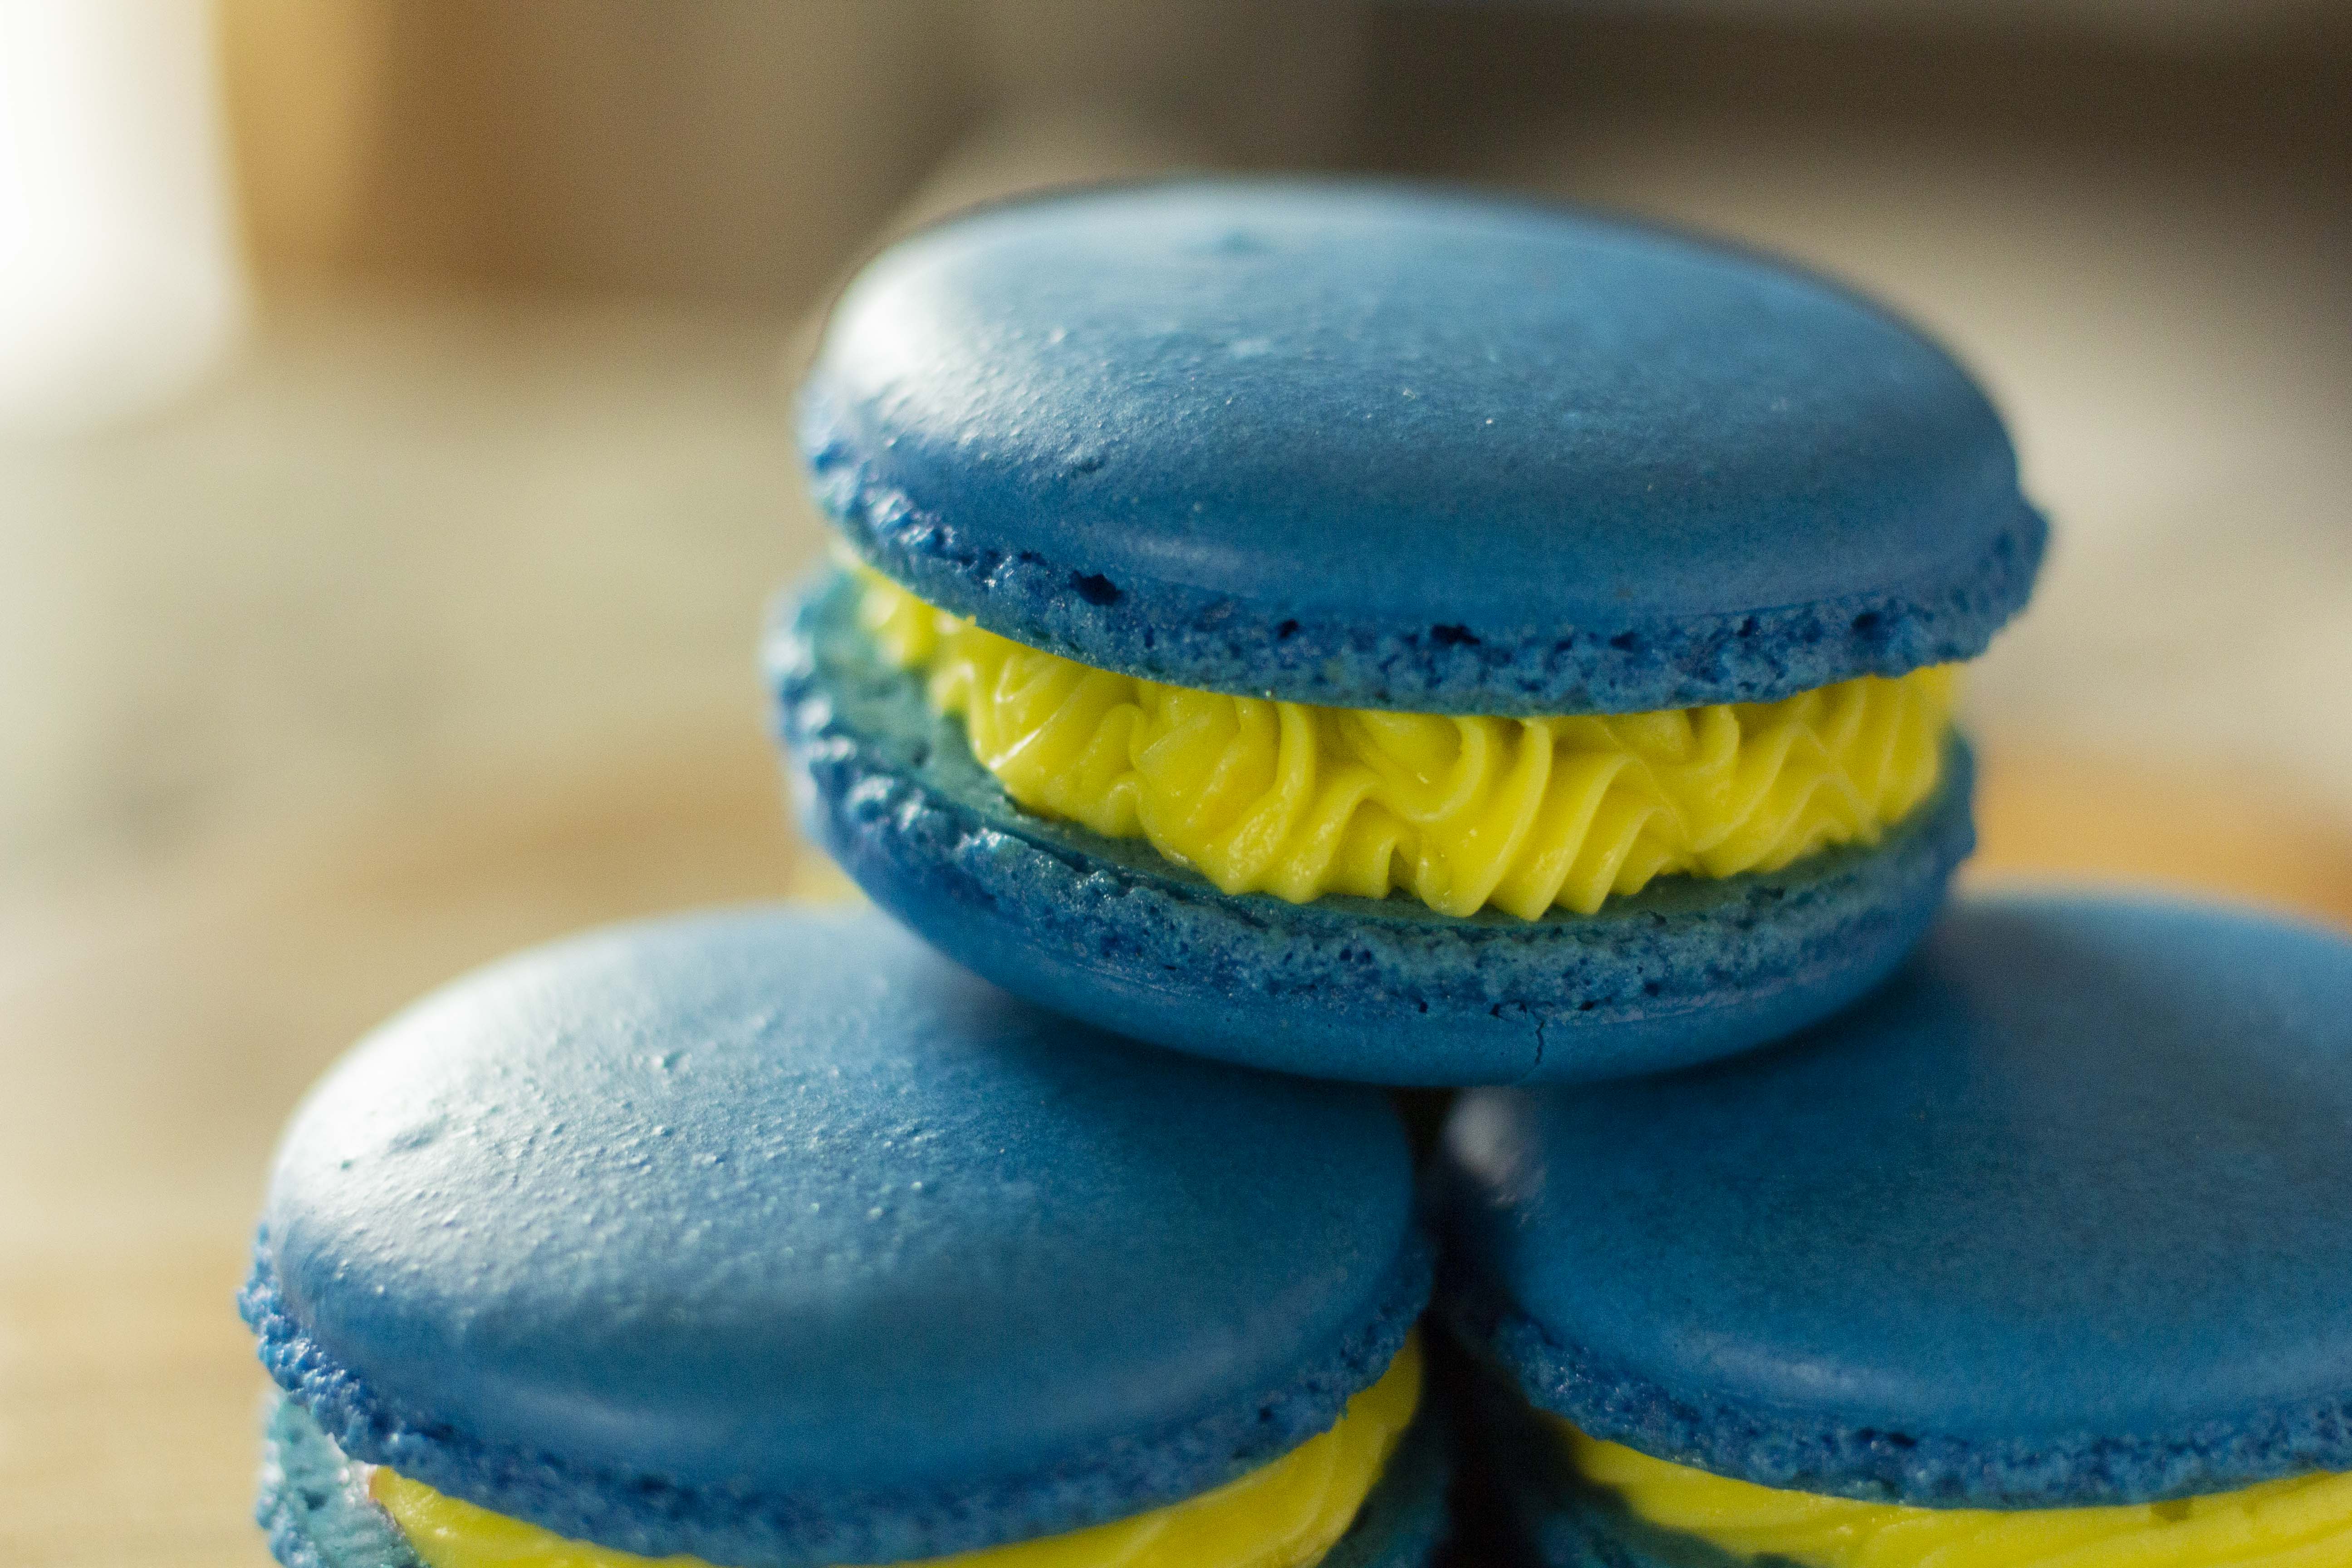
Boston Uprising Macarons

Fair warning – this post is going to be a long one. Macarons can be intensely complicated things, and I didn’t go easy on you for this first one. There are three components to this macaron, but first and foremost, there’s the shell. Easily the hardest part. They may take you several tries to get it right (it took me 10 to be able to consistently make them), but don’t let that bother you. I have faith in your abilities! If you want an insanely good tutorial, check out Indulge with Mimi. I learned all my tips and tricks from her!
Let’s start with a few things that are very important for making a good macaron.
- Your eggs should be room temperature. Most of the time I don’t think it matters, but with macarons it really does. There’s something about a room temperature meringue mixing with the almond flour and sugar that makes a big difference in your shell quality.
- Everything should be free from water. This includes any bowls, whisks, or spatulas you use. Water can cause a meringue to split, and that would completely defeat the purpose of making one!
- Folding in the dry ingredients to the meringue is called macaronage and it is the most important step in this entire process. If you fold too little, you’ll get grainy macarons that will be lumpy. If you fold too much you’ll get flat, crunchy macarons without any feet. It’s a really delicate process that may take you a few tries to get right. But I have faith in you. You got this. The final macaron batter should look like honey or lava, and should run from your spatula slowly and without any breaks.
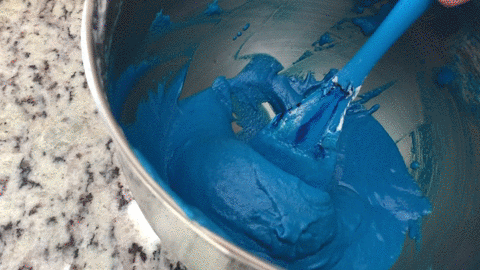
- Only use gel food coloring. The other kind has water in it, and we really don’t want to add any excess liquid to your meringue. It’ll completely ruin the meringue. So, for the sake of your mental health, only use gel!
- The rest is extremely important. If your macarons don’t acquire a dry outer coat they won’t bake properly. Never skip the rest.
- In order to make sure your macarons are baked properly, the top shouldn’t move if lightly jiggled during baking. If there’s any major movement, the insides are still raw. Be patient – it can even be better to overbake than underbake a macaron shell.
We are making a french meringue macaron – probably the most simple of the meringues. It’s as simple as making a french meringue, folding in some dry ingredients, and piping into circles. So let’s start by separating your egg whites from your yolks. One egg contains about 30 grams of whites, so this recipe will take about 3.5 eggs. Put the yolks aside in a bowl (to be used for the curd later) and place the whites in the bowl of a stand mixer.


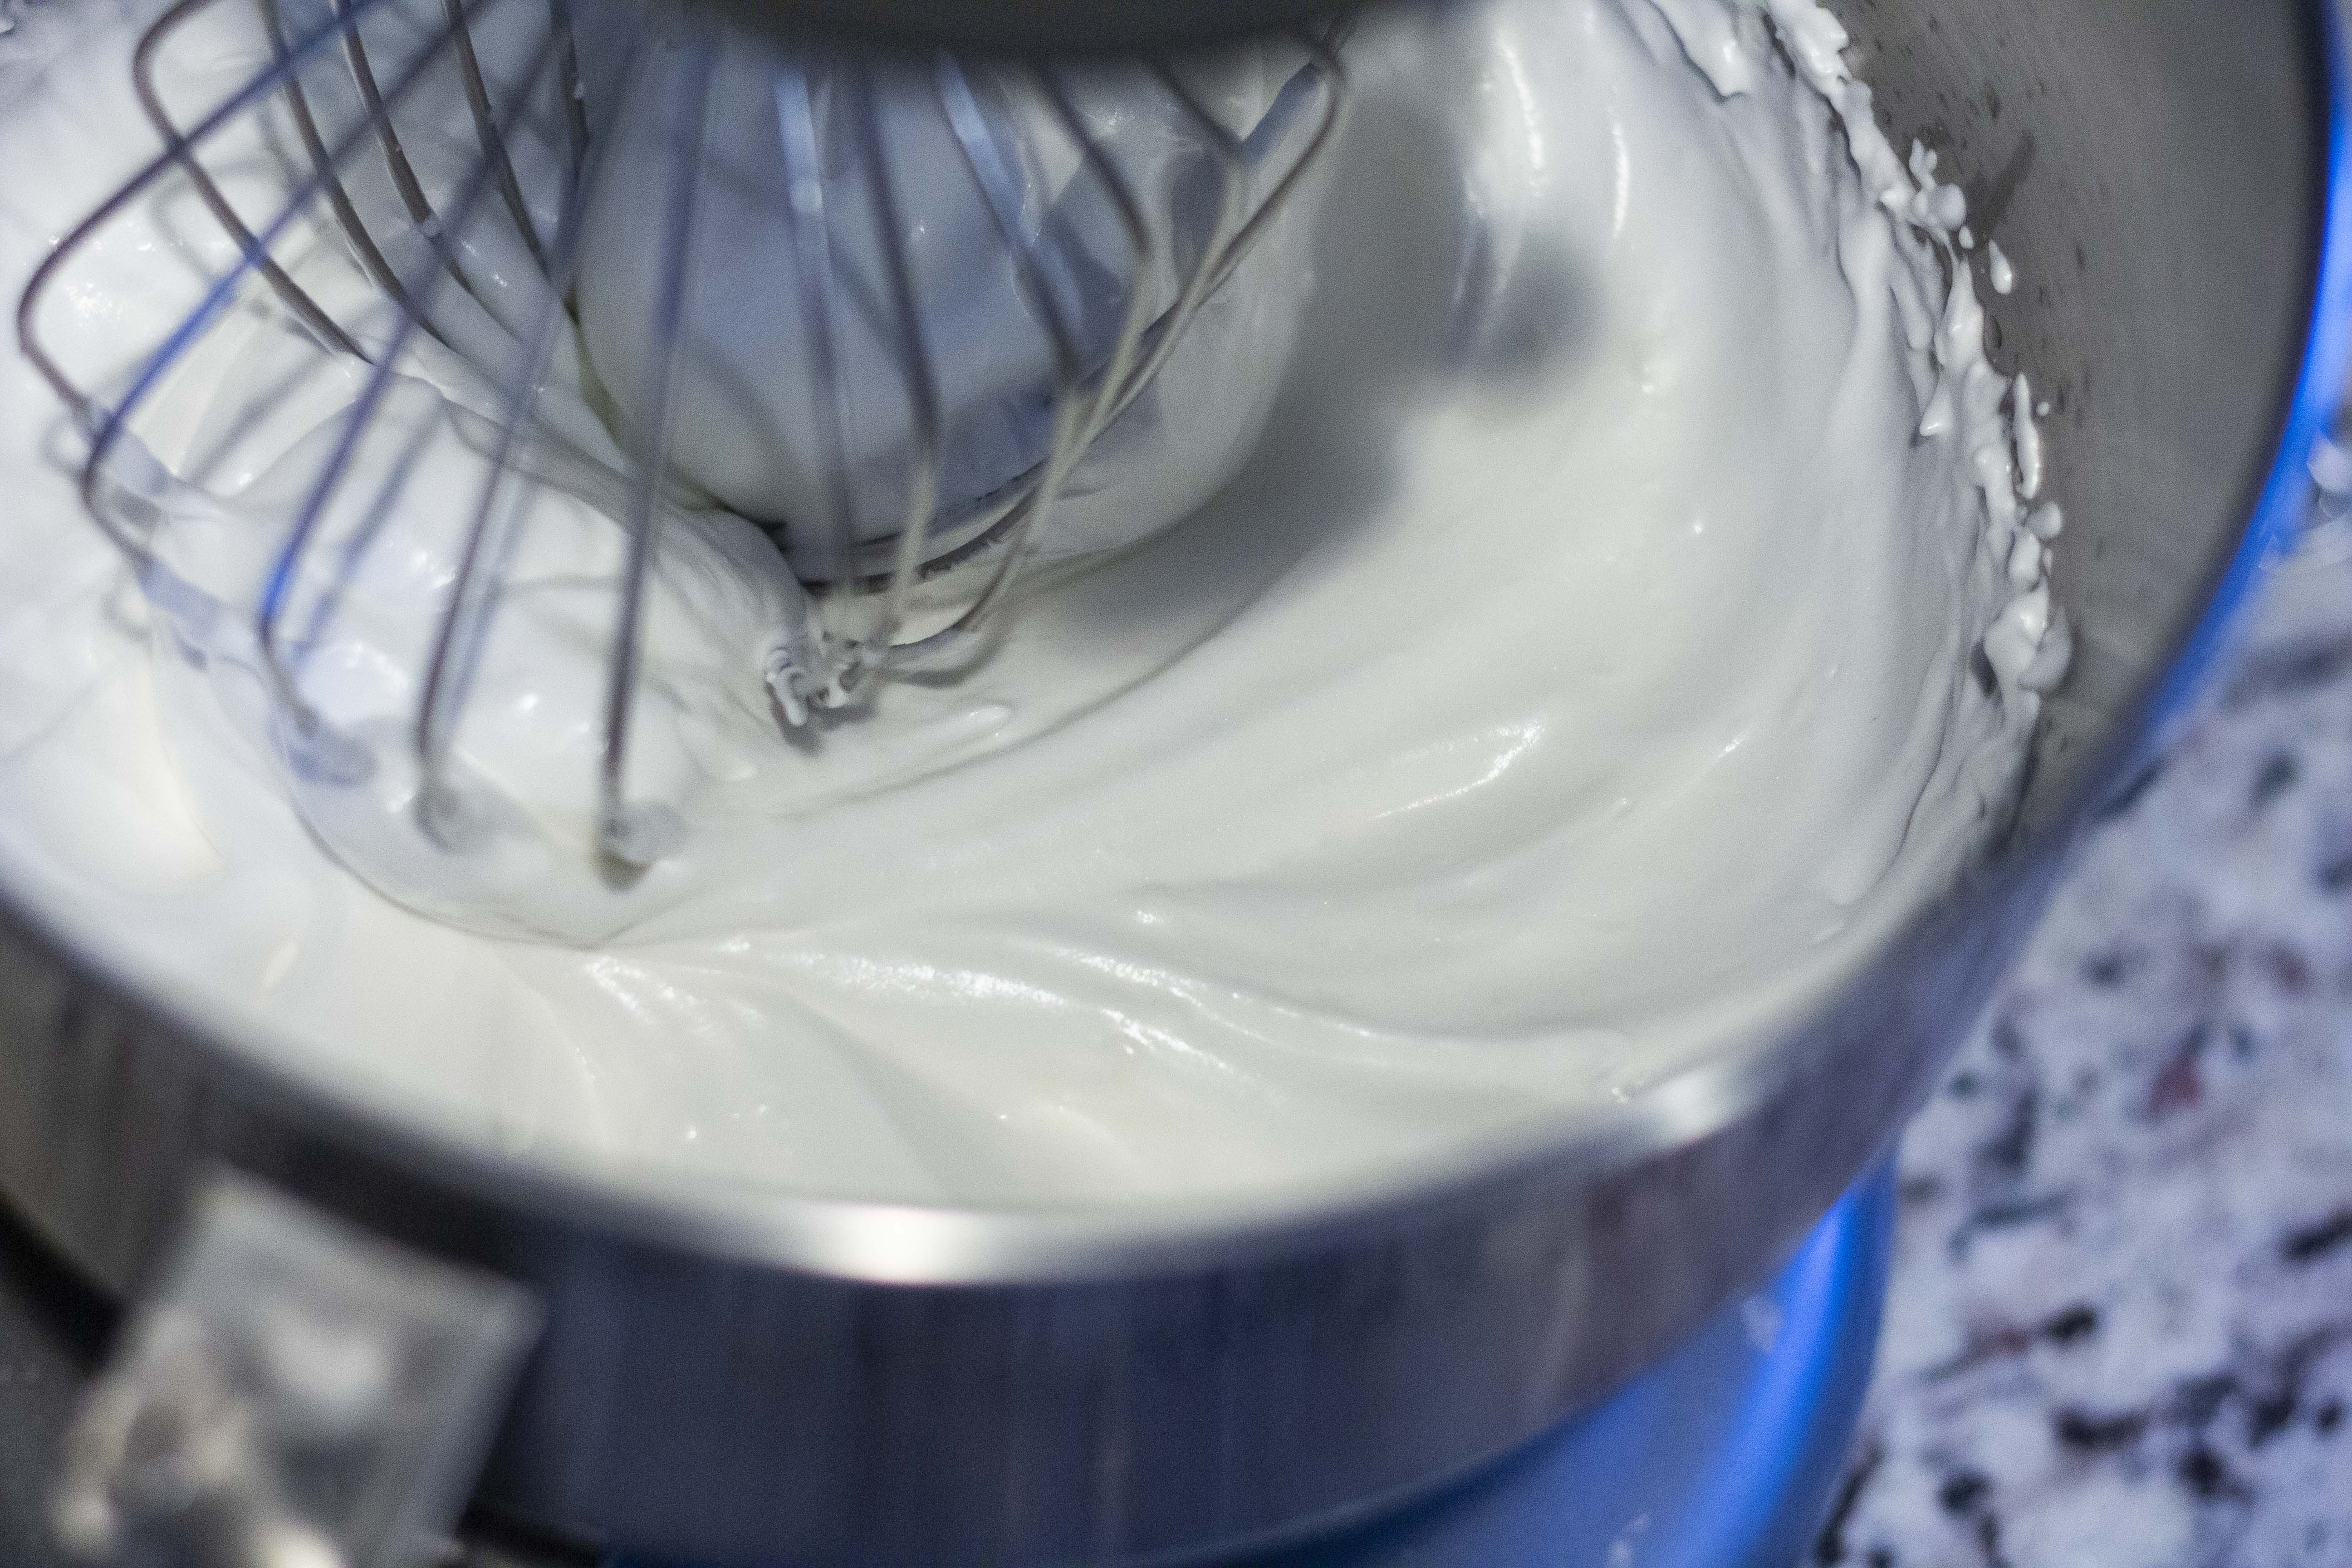
Let’s make the meringue now! Add a whisk attachment (or use a bowl and hand whisk and watch as your arm falls off) and turn on the speed, slowly bringing it up to high. Continue to whisk until the eggs are frothy, then add all the cream of tartar at once. Continue whisking until the eggs start to form soft peaks.


At this point we want to add the sugar. Now, a lot of people add it a tablespoon at a time to prevent grainy meringues. Honestly, I’ve never had a problem, and with a macaron you probably can’t tell anyway. So just add the sugar around the bowl (not all in one spot) and continue to whisk on high until stiff peaks form. These peaks should not, under any circumstance, fall over if you tip the bowl or the whisk upside down. You want the meringue completely stiff. The entire process should take between 8-10 minutes, depending on your mixer.

Next comes the hard part – the part that’ll screw everything else up. We are going to fold in the flour and sugar. But first things first – let’s mix together the dry ingredients. You really need to mix with your hands here. Add all the powdered sugar and almond flour to a bowl and stir with your fingers. As you’re mixing be sure to rub all the large almond chunks out of the mixture. These will completely screw up your batter, so we definitely don’t want them in there.


Now we start the macaronage. Add about 1/3 of the dry ingredients and the food coloring to the meringue. Now gently fold by passing your spatula down the center of the bowl, scraping around all the edges, and around the bottom, finishing by folding that scraped-up portion back over itself. Down the center, around the edge, flip over. Repeat that process until the batter resembles, as I’ve mentioned above, lava. While you’re folding you should be trying to push a lot of the air out of the batter. We actually, in spite of making a meringue, don’t want a ton of air in the batter. To remove it simply push the batter up against the side of the bowl prior to you reaching the correct consistency. This video will maybe hopefully help with your ability to see what I’m talking about!
Once the macaron batter is ready simply fill a piping bag fit with a large round tip with your batter. Pipe a big blob in one spot on a piece of parchment paper or silicone mat, trying to keep your piping pressure consistent. To get equal size circles you can either find a good template online or simply count the seconds you’re expelling your batter. The second method won’t be perfect, but it’ll be easier and close enough! It’s my favorite method.

Once all the macarons are piped simply bang the baking sheet on the counter a few times to remove any air that remains (to prevent weird holes) and allow them to sit out at room temperature, for 30 minutes. This rest will allow a good skin to form on the macaron.
When the macarons are almost done resting preheat your oven. When it’s done preheating bake one sheet at a time on the middle rack for 12-15 minutes. Just make sure you check it before you pull them out, like I talk about in the notes, to ensure they’re properly baked.

After the macarons are baked leave them on your baking sheet until they’re completely cool. If you don’t they’ll still be slightly sticky and the centers will come out of the shell and stick to the mat. It’s horribly annoying. So just be patient and they’ll come off really easily!

While the macarons are baking/cooling you can make your curd and your buttercream. Honestly, the curd takes a while to cool, so let’s do that first! It’s much easier than the shell – I promise. We need to cook the curd over a double boiler, so use a stainless steel or glass bowl that fits securely in the rim of a small pot. Add enough water to boil in the small pot, but ensure that the water level won’t touch the bottom of the bowl. It should be about 1-2 inches of water. Bring water to a simmer.
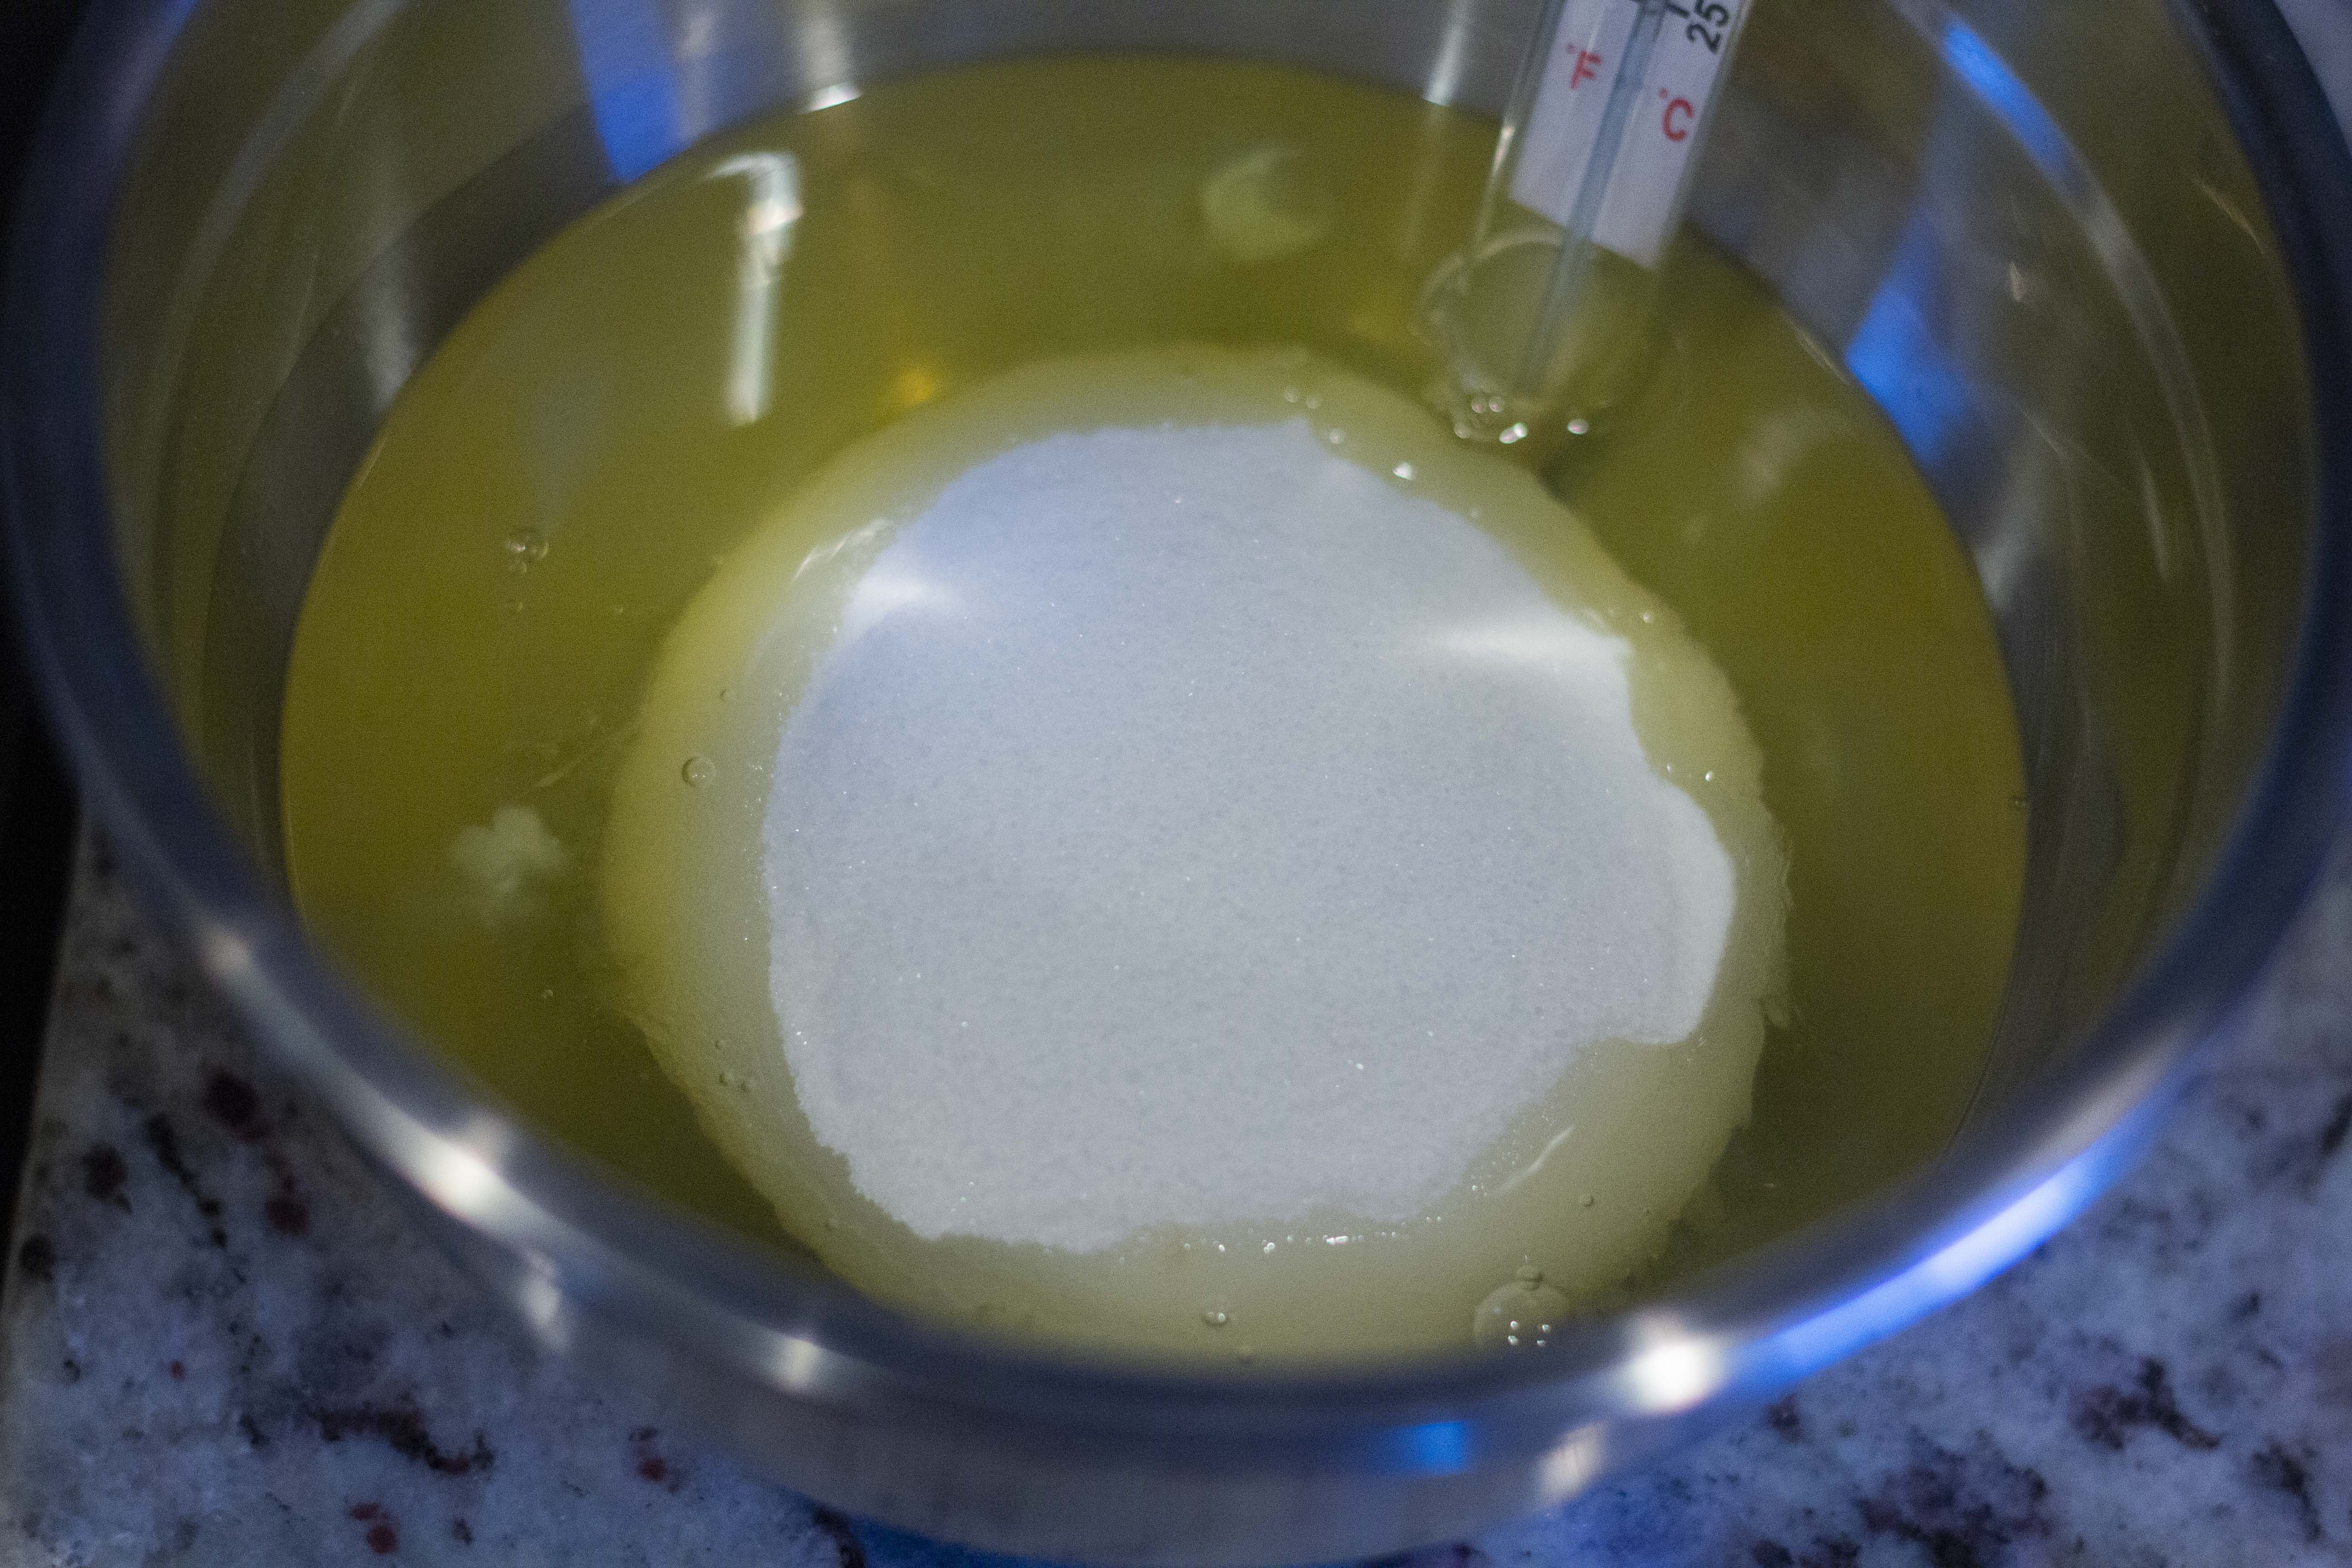
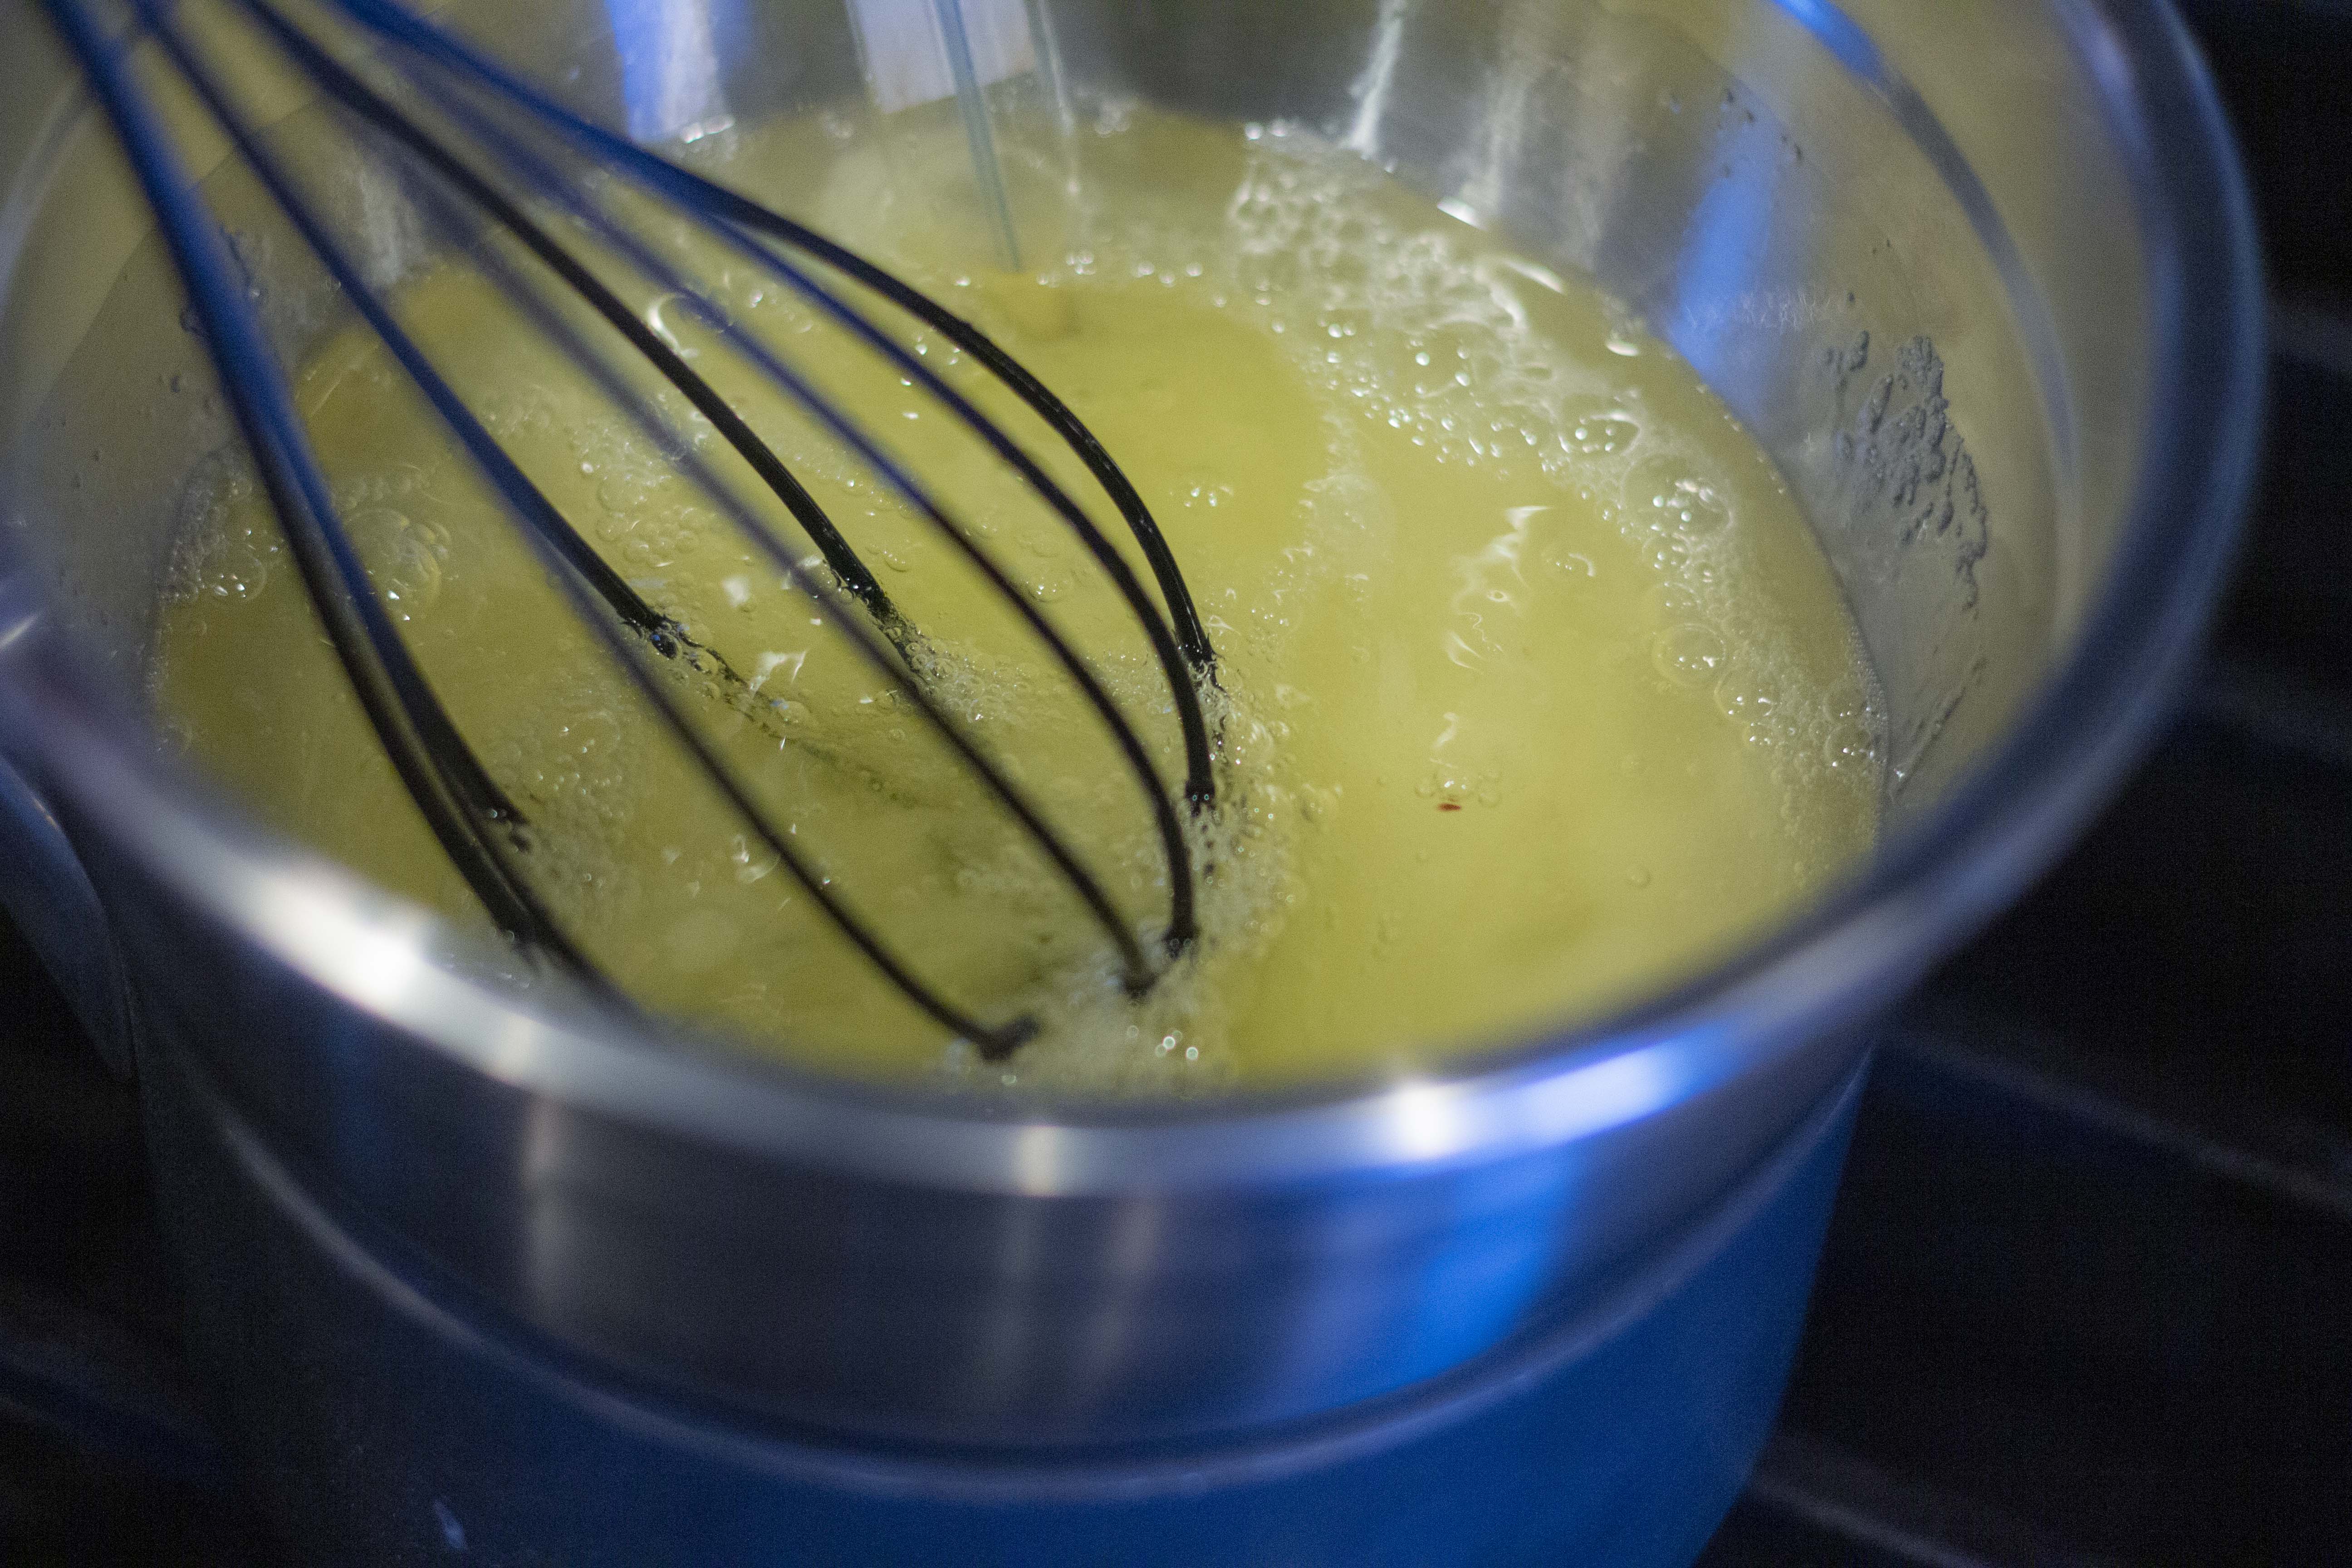
Then blend your blueberries until pureed. It doesn’t have to be perfect, but as smooth as you can get. Add the blueberry puree and lemon juice to either a stainless steel or glass bowl and add the sugar. Whisk this together and add the yolk (saved from the shells) and whole egg. Once you add the eggs you need to whisk continuously to prevent the sugar from cooking the yolks. It sounds weird, but the sugar can actually do that to the yolk and make it grainy.


Put the bowl over the simmering water and whisk until the curd thickens. It’ll happen around 180F, for those of you with a thermometer. But in reality, you don’t need one. You’ll be in the middle of whisking, feeling like it’s taking forever, and then you’ll feel it thicken. You’ll be able to see it sticking thickly to the whisk and to the bowl, it’ll feel sluggish and look delicious. When this happens, remove the bowl from the simmering pan and add the butter all at once. Whisk until the butter is incorporated and then allow to cool until the curd reaches room temperature. You can speed this up by putting the bowl in the fridge and whisk from time to time to release the heat.
Now, 2 elements down, let’s make the third! It’s one of my favorite things in the world – a lemon Swiss meringue buttercream. If you’ve never made a Swiss meringue buttercream it;s the most amazing thing in the entire world. I thought I hated frosting, even homemade frosting, but I realized what I really hated was American buttercream. A solid, Swiss buttercream is thick, creamy, and not overpoweringly sweet. It’s perfect, though a lot trickier to make.
Start by separating your eggs whites from your yolks. Guys, I’ve had to find a lot of new recipes for all the yolks I have leftover from the frosting I’ve been made… But I digress. You’ll add your sugar to the whites, put them back over that double boiler we had for the curd, and whisk until the mixture reaches 160F. This time you’ll want to have a thermometer – it’s very important the eggs reach at least 160F to kill off the threat of salmonella before you eat it. There’s not really a visual cue for this, either, so you’ll need something to help you.


When the correct temperature is reached add the whites to the bowl of a stand mixer and whisk on high until the bowl starts to feel cool and the mixture gets thick and shiny. At this point you’ll start adding the room temperature butter, one tablespoon at a time. It’ll take a while to get through all the butter. And, in the process, the mixture will start to look curdled. You’ll panic that something went wrong. I promise, nothing went wrong. Just keep adding butter and keep whisking and it’ll become smooth and buttery and delicious.

While this is wash and zest the lemon and juice it. You’ll be tempted to just use pre-juiced lemon juice. Don’t. Fresh-pressed lemon juice is a little sweeter and a little more acidic. Everything will taste better if you just get in the habit of always having lemons on hand.
When the buttercream is smooth and homogeneous you’ll add all the lemon juice, zest, and the yellow gel food coloring. Continue whisking until the buttercream comes back together. It’ll feel like it splits again, but be patient, it’ll come together, get thick, and creamy.
Now, all the elements are made! It’s time for assembly.


Match up the macaron shells to size. Turn one side over to prepare for adding the buttercream and the curd. Add the buttercream to a piping bag and pipe a ring on the outside of the shell. Fill the center of the ring with the blueberry curd. Now cover with the other shell and make a sandwich.
One thing to note about macarons – they taste significantly better the next day. Everything looks so pretty you’ll be tempted to eat it right away. Don’t! Make these the day before you want them and then enjoy them the right way. When you let macarons sit the shells soak up some of the flavor from the fillings, making them seems more tender and less sweet. It’s worth the wait!
Boston Uprising Macarons

Blueberry and lemon macarons inspired by the Boston Uprising
Macaron
- 100 grams egg whites- 1/4 teaspoon cream of tartar- 75 grams baker’s sugar- 125 grams almond flour- 125 grams powdered sugar- blue gel food coloring
Blueberry
- 98 grams blueberry puree (about 1/2 cup blueberries)- 85 grams sugar- 25 grams salted butter, room temperature- 1 egg- 1 egg yolk
Lemon
- 75 grams egg whites- 75 grams sugar- 143 grams salted butter, room temperature- 2 tablespoons lemon juice- zest of one lemon- yellow gel food coloring
Macaron
- Separate your egg whites from your yolks, reserving one yolk for the blueberry curd. Place the whites in the bowl of a stand mixer2. Add a whisk attachment to the stand mixer and slowly increase the speed, bringing it up to high.3. Whisk until the eggs are frothy and then add all the cream of tartar at once.4. Continue whisking until the eggs form soft peaks. Add the sugar around the bowl and continue to whisk on high until stiff peaks form. The meringue should be stiff and peaks should not fall if turned over. The entire process should take between 8-10 minutes, depending on your mixer.5. Measure all the powdered sugar and almond flour to a bowl and stir with your fingers. As you’re mixing be sure to rub all the large almond chunks out of the mixture.6. Add about 1/3 of the dry ingredients and the food coloring to the meringue. Gently fold the dry into the meringue by passing your spatula down the center of the bowl, scraping around the edges, finishing by folding that scraped-up portion back over itself. Repeat that process until the batter resembles lava or honey. While you’re folding remove the air by pushing the batter up against the side of the bowl. 7. Fill a piping bag fit with a large round tip with your batter. Pipe in a steady stream onto one spot on a piece of parchment paper or silicone mat, trying to keep your piping pressure consistent. To get equal size circles either find a template online or count the seconds you’re expelling your batter.8. Once all the macarons are piped bang the baking sheet on the counter a few times to remove any air that remains and allow them to sit out at room temperature for 30 minutes.9. Preheat your oven to 320F. Bake, one sheet at a time, for 12-15 minutes. The shells should be stiff, the feet shouldn’t jiggle, and the top shouldn’t shift if gently moved.10. Leave the macarons on your baking sheet until they’re completely cool.
Blueberry
- Create a double boiler by choosing a stainless steel or glass bowl that fits securely in the rim of a small pot. Add enough water to boil in the small pot, but ensure that the water level won’t touch the bottom of the bowl. It should be about 1-2 inches of water. Bring water to a simmer.2. Blend your blueberries until pureed. Add the blueberry puree and lemon juice to the chosen bowl and add the sugar. Whisk this together and add the yolk and whole egg.3. Put the bowl over the simmering water and whisk until the curd thickens. The curd will reach around 180F, will stick to the whisk, and feel thick. 4. Remove the bowl from the simmering pan and add the butter all at once. Whisk until the butter is incorporated and then allow to cool until the curd reaches room temperature.
Lemon
- Separate your eggs whites from your yolks.2. Add your sugar to the whites.3. Place the bowl over a double boiler and whisk until the mixture reaches 160F.4. Whisk until the eggs reach a temperature of at least 160F, measured with a candy or instant-read thermometer.5. Add the whites to the bowl of a stand mixer and whisk on high until the bowl starts to feel cool and the mixture gets thick and shiny.6. Add the room temperature butter, one tablespoon at a time. In the process, the mixture will start to look curdled, but keep adding butter and keep whisking and it’ll become smooth and creamy again.7. Wash and zest the lemon and juice it.8. When the buttercream is smooth and homogeneous add all the lemon juice, zest, and enough yellow gel food coloring to change the color to bright yellow. Continue whisking until the buttercream comes back together.
Macaron
- Match up the macaron shells to size. Turn one side over to prepare for adding the buttercream and the curd.2. Add the buttercream to a piping bag and pipe a ring on the outside of the shell.3. Fill the center of the ring with the blueberry curd.4. Cover with the other shell and make a sandwich. Refrigerate overnight for best flavor.
