Pumpkin Pie

Pumpkin Pie

Let’s talk about a few things.  I’ve been having a bit of a depression backslide lately.  There was a thing that happened, it was incredibly difficult to handle, and I haven’t really quite recovered yet.  So I haven’t been posting, as you are all well aware.  I’m sad about that, and I hope you are, too!  So I’ve made a few decisions that will, hopefully (finger’s crossed) help keep things moving a little more regularly on the blog as well as giving me enough time to continue to heal mentally.

Decision one: I think this blog is about to become very recipe-heavy!  I think there are some of you who are clapping and some who are booing, but all in all, I think this will be a good short-term solution.  I want to be better about posting BotW recipes and focusing on that instead of collaborations or even Thursday Thoughts will help that!  So get ready for one BotW recipe per week.  That’s definitely happening.

Decision two: I’m working on a pretty big (at least emotionally) Thursday Thoughts post.  I’m not sure when it’ll be done, but maybe at the end of the year.  It’s something I think will really help with some of the depression and anxiety I’ve been struggling with recently and hopefully will be worth reading!  So until then, I probably won’t do any other Thursday Thoughts.

Decision three:  In order to be a little more grateful in my life for the things that are going right and well I want to spend the rest of the year adding (maybe not every week, mind you) recipes from bloggers who have been supportive and inspiring and people who have helped shaped my life.  These will all be non-Zelda recipes and will showcase their favoriate/family recipes or recipes that have serious importance in my development as a person.  Hopefully you enjoy this season a little more because of these and we can all feel a little more appreciation for the wonderful people in our lives!

And now, without further ado, on to the first of two Thanksgiving (at least here in the U.S) recipes: pumpkin pie.

Pumpkin PiePumpkin pie meter and time

pumpkin pie ingredients

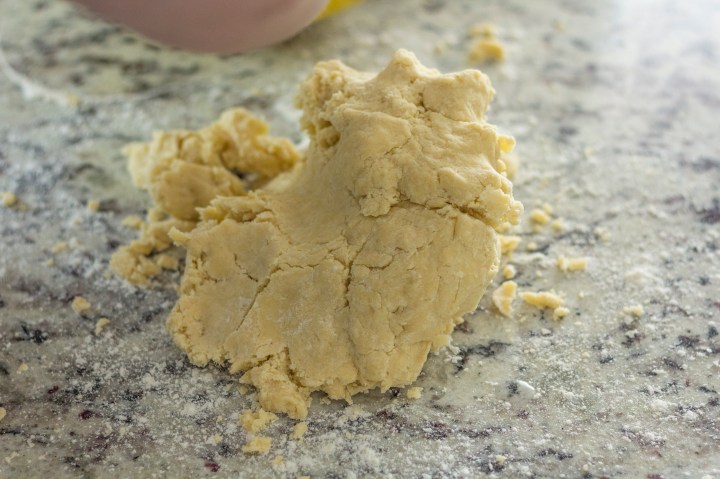
We start, as we did with the apple pie, with a pie crust.  For the real details check out my Apple Pie recipe.  For those of you who stick with me let’s shorten this up (see what I did there?).  Cut in the butter, add a tiny bit of cold water, mix, add more, etc… until you get the perfect, just-held-together texture.  Once we’re there simply wrap and refrigerate for about 15 minutes.

Now for the insides.  The very easy insides.

pimpkin, sugar, spices

Measure out the pumpkin, sugar, cinnamon, nutmeg, allspice, and cloves into a bowl.  Mix and stir until combined.  Add two eggs.  Now, you can either beat the eggs before you add them or do as I do and add the eggs, lightly beat them on top of the pumpkin mixture, and then mix everything all together.  I’m all about shortcuts here.

Once everything is mixed and homogenous add the cream and stir until combined.  It’ll look pale and a little fluffy.

Take the pie crust out of the fridge, lightly flour a surface, and roll the crust out into a round shape large enough to cover the pie tin and hopefully less than 1/4 inch thick.  Thick crust makes for weird pie, so thinner can definitely be better.  Using the coolest technique ever, gently roll the crust onto your rolling pin and unroll it into the ungreased pie tin.  It’ll make you look really awesome so be sure to do it while other people are looking.  If they aren’t make sure you cough loudly or sneeze to get their attention.

Gently press the crust into the tin, folding the crust over itself to patch any holes.  You can do the next step one of two ways: either cut the excess crust and then crimp it into a pretty shape OR crimp it and then cut off the excess.  Either way is fine, just make sure if you choose the first option you leave enough to crimp.

Pumpkin pie filling

Add the filling until it fills the crust at least 3/4 of the way.  It’ll rise a little as it bakes, but not too much.  We don’t want it over-full or you’ll get horrible burned stuff all over your oven.  And we don’t want it under-filled or you’ll get too much crust on top… Like mine…  Do as I say, grasshopper, not as I do…  Now bake for about 55-65 minutes.  The key is that the filling turns a lovely shade of darker brown and has a crack in the top.  If there’s no crack it may not be done.  If you’re unsure give the pie a bit of a wobble.  If it moves a lot, it’s not done.  If it’s a little more stiff it’s probably ready!

finished pie

Remove, make some whipped cream by adding sugar to cream that you are currently whipping, and serve!

delicious pie!

Link’s Pumpkin Pie recipe:

      • Fortified Pumpkin
      • Tabantha Wheat
      • Cane Sugar
      • Goat Butter

      Pumpkin Pie

      • Servings: 1 pie, 9 inches diameter
      • Difficulty: moderately easy
      • Print

      Homemade Pumpkin Pie


      Pie

      • 2 cups flour
      • 2/3 cup cold butter, cut into tablespoons
      • 1/3 teaspoon salt
      • 4-6 tablespoons ice-cold water

      Pumpkin

      • 1 15 oz can pumpkin puree
      • 1 teaspoon ground cinnamon
      • 1/2 teaspoon ground nutmeg
      • 1/2 teaspoon ground cloves
      • 1/3 teaspoon ground allspice
      • 3/4 cup sugar
      • 2 large eggs
      • 3/4 cup heavy cream

      Directions

      1. Pre-heat the oven to 375°F and add some ice to a small cup of water.
      2. Add the flour and salt to a mixing bowl. Cut the butter into tablespoon-sized pieces. Add the butter to the flour and begin rubbing it between your fingers while adding flour. This will create a breadcrumb-like texture. Make sure you leave some butter pieces as large as peas.
      3. Handling the dough as little as possible, start adding water a few tablespoons at a time until the mixture begins to hold together. The dough will be a bit shaggy but should be mostly cohesive.
      4. Wrap the dough in cling wrap.  Refrigerate for 15 minutes.
      5. While the dough is chilling make the filling.
      6. Add all pumpkin puree, sugar, and spices to a bowl and mix until combined.
      7. Add the eggs and lightly beat them on top of the mixture before adding them to the pumpkin.
      8. Add all the cream and stir until combined. The mixture should be light brown and creamy.
      9. When the dough has chilled remove it from the fridge.  Lightly flour a surface and roll it out into a round shape large enough to drape over the edges of the 9 inch pie tin and thinner than 1/4 inch.  Do not grease the tin beforehand.
      10. Roll the dough onto your rolling pin and unroll into the pie tin. Gently press the dough into the shape of the tin, filling any cracks with excess as necessary.
      11. Add all the pumpkin pie filling. It should fill at least 3/4 of the tin.
      12. Remove the excess crust using an knife and, using a pinching technique between two fingers on one hand and a finger on the other, pinch the crust to create a crimped look.
      13. Bake for 55-65 minutes. Check your pie about 40 minutes into the bake.  If it’s starting to look too dark on top gently place a layer of tinfoil on the parts that are browning too quickly. When it’s baked you should notice a significant darkening of the filling and the filling should have formed a bit of a crack. It should have a slightly firm wobble. If the filling isn’t cooked place it back in the oven for a few more minutes.  Once it’s baked remove the pie from the oven and allow to cool in the tin for at least an hour before you eat it. Serve with whipped cream, if desired.

Apple Pie

Apple Pie

It’s beginning to feel a lot like Autumn

Everywhere you look

There’s some rain that is falling down

And leaves that are turning brown

And pumpkin spice and sweaters all around!

So after that are you still here?  Yeah?  Well I can’t help it!  I love Autumn (or as we call it in the U.S. because American English is a pretty strange language, Fall) and it’s finally here!  Everything is cooling off, the squash are starting to ripen, apples are falling, cinnamon and nutmeg are everywhere, and the smell of wet pavement is a dream!  When things start to get chilly we naturally turn to deliciously warm food and spices to heat things up and what could possibly be better than fresh apple pie?  I submit that nothing could be… unless you don’t like pie… like me…

Apple Piemeter and time

apple pie ingredients

We start with a pie crust, technically called a short crust pastry.  There are other kinds of pastry you could use but this is a traditional and well-established method.  And since this was my very first apple pie ever, I thought we should go easy on ourselves.

Put some water into a cup and add a cube or two of ice.  The colder the water, the better the pastry will turn out.  Then let’s rub the cold butter into the flour until it resembles bread crumbs with some pea-sized chunks of butter left.  You don’t want it too fine or you won’t get a nice flaky crust!

Now for the scary part.  Once we start adding water we need to handle the dough as little as possible to get the best crust.  Start with a few tablespoons, mix it in with your hands, add a few more, mix, lather, rinse, repeat until you’ve got a dough that sticks together well but isn’t too wet.  It should be, as we say, a little shaggy, with some dried flour/butter bits still left over.  See the photo if you have questions.

shaggy dough

Lightly flour a surface and knead the dough together until it forms a cohesive mass.  Again, don’t handle it too much or it’ll be stiff and tough.  Split it so you have 1/3 and 2/3 in separate balls and wrap each in cling wrap.  Refrigerate for a while so it relaxes and doesn’t get too tough.

wrapped dough

Now let’s make the filling!

sliced applesThinly slice the apples, making sure to remove the core.  I like to leave the peel on for some added texture but if it bothers you, feel free to peel them as well.  Then add all the apples to a bowl and add the flour, cinnamon, nutmeg, and brown sugar to the apples.  Mix it around with your hands until all the apples are coated evenly and set aside.  PS – this is a pretty standard pie filling recipe but I’ve switched out the regular white sugar for brown sugar.  I’ve found it makes it a little more like caramel apples in flavor and I love it!

When the dough has chilled for about 15 minutes remove the smaller third from the fridge.  Lightly flour a surface and roll it out into a round shape large enough to drape over the edges of the pie tin you are using.  Don’t grease the tin or anything – there’s enough butter in the crust to take care of that for you!  Remove the remaining 2/3 dough from the fridge, flour your surface, and roll it out into a rectangle at least the width of the pie tin and the longest you can.  You want it as thin as you can get it because we are weaving this to match Link’s pie.  If you wind up with bits that crack don’t worry, shortcrust is super forgiving.  Just patch them up with some excess crust and roll over the top!

shortcrust rolled out

Once we have a nice rectangle cut the strips into 1 inch wide pieces.  Lightly flour another surface and let’st start weaving!  Lay out strips right next to each other the width of your pie tin.  Take leftover strips and weave them, starting from the center, through the strips you’ve laid out.  Over, under, over, under.  Take another strip and weave it the opposite way, so you’re two strips are over/under opposite one another.  Continue until you have a nice, even lattice.  If you run out of strips, no worries.  Just gather up any scraps and roll them out again.  Cut from that and you should be golden.  This crust recipe may be a little tight but it fit my 10 inch diameter pie tin just fine!  And don’t weave this lattice too tightly – we need to have some space for air to escape so the pie doesn’t explode!

Lightly flour the bottom of the pie crust in the tin.  This helps with the moisture and prevents you from incurring the wrath of Mary Berry and having a soggy bottom.  Add all the apples to the crust.  Don’t overfill the pie, we want it to be level with the top of the tin.  If you’re left with extra you won’t regret just eating them.  Promise.

Gently, using a combination of prayers, incantations, friend’s hands, and extra strong hopes, pick up your lattice somehow and lay it on top of the pie.  If you are lucky enough to have a flat, large sheet you can slide under it, lay it on the pie, and slide out do that!  If not, you’ll have to get some help.  If it breaks a little, again, no worries!  Just mash the pieces together and call it good.

Using a pinching technique between two fingers on one hand and a finger on the other, pinch the top and bottom layers of crust together.  Trim the excess off the sides using a knife, brush the top of the pie with milk, and bake!

Check your pie about 40 minutes into the bake.  If it’s starting to look too dark on top gently place a layer of tinfoil to the parts that are browning too quickly.  This didn’t happen to me so I don’t have any photos.  If it looks light and raw still you shouldn’t have a problem.  Once it’s baked remove the pie from the oven and allow to cool in the tin for at least an hour before you eat it!

fresh apple pie

Link’s Apple Pie recipe:

      • Apple or Wildberry
      • Any fruit
      • Tabantha Wheat
      • Cane Sugar

Apple Pie

  • Servings: 1 pie
  • Difficulty: moderate
  • Print

Homemade apple pie using fresh, tart apples

Pie

  • 3 cups flour
  • 1 cup cold butter, cut into tablespoons
  • 1/2 teaspoon salt
  • 6-9 tablespoons ice-cold water

Apple

  • 2 1/2 pounds tart apples
  • 1 teaspoon vanilla
  • 1/8 teaspoon salt
  • 1.5 tablespoons cornstarch
  • 1/4 cup sugar
  • 1 large egg
  • 2 tablespoons butter

Directions

  1. Pre-heat the oven to 375°F and add some ice to a small cup of water.
  2. Add the flour and salt to a mixing bowl. Cut the butter into tablespoon-sized pieces. Add the butter to the flour and begin rubbing it between your fingers while adding flour. This will create a breadcrumb-like texture. Make sure you leave some butter pieces as large as peas.
  3. Handling the dough as little as possible, start adding water a few tablespoons at a time until the mixture begins to hold together. The dough will be a bit shaggy but should be mostly cohesive.
  4. Lightly flour a surface and knead the dough together until it forms a cohesive mass, being careful not to handle it too much.
  5. Split the dough so you have 1/3 and 2/3 in separate balls and wrap each in cling wrap.  Refrigerate for 15 minutes.
  6. While the dough is chilling make the filling.
  7. Thinly slice the apples, making sure to remove the core.  You may peel the apples or leave the skin on, but leaving the skin gives it a little more texture and color.
  8. Add all the apples to a bowl and add the flour, cinnamon, nutmeg, and brown sugar.  Mix it with your hands until all the apples are coated evenly. Set this bowl aside aside.
  9. When the dough has chilled remove the smaller third from the fridge.  Lightly flour a surface and roll it out into a round shape large enough to drape over the edges of the pie tin you are using.  Do not grease the tin beforehand.
  10. Remove the remaining 2/3 dough from the fridge, flour your surface, and roll it out into a rectangle at least the width of the pie tin and the longest you can.  You want it fairly thin because we will be weaving the top. If you wind up with bits that crack just patch them up with some excess crust and roll over the top.
  11. Cut the strips into 1 inch wide pieces.  Lightly flour another surface to begin weaving.
  12. Lay out strips right next to each other the width of your pie tin.  Take leftover strips and weave them, starting from the center, through the strips you’ve laid out by placing the strip over then under the next strip. Take another strip and weave it the opposite way, so you’re two strips are over/under opposite one another.  Continue until you have a nice, even lattice.  If you run out of strips simply gather up any scraps and roll them out again.  Cut new strips to finish the lattice. Don’t weave this lattice too tightly – we need to have some space for air to escape so the pie doesn’t explode!
  13. Lightly flour the bottom of the pie crust in the tin.  This helps with the moisture from the apples and keeps the crust crisp. Add all the apple mixture to the crust.  Don’t overfill the pie, we want it to be level with the top of the tin.
  14. Gently pick up your lattice and lay it on top of the pie. If it breaks a little, again, no worries!  Just mash the pieces together and call it good.
  15. Using a pinching technique between two fingers on one hand and a finger on the other, pinch the top and bottom layers of crust together.  Trim any excess pie crust from the sides with a knife so it’s an even finish.  Brush the top of the pie with milk and bake for 45-55 minutes or until golden brown.
  16. Check your pie about 40 minutes into the bake.  If it’s starting to look too dark on top gently place a layer of tinfoil to the parts that are browning too quickly.  Once it’s baked remove the pie from the oven and allow to cool in the tin for at least an hour before you eat it.

Fish Pie

Fish Pie

Guys- I’m sorry about the whole “no post thing” yesterday.  I’m currently preparing for a vacation on top of several fires at work and I completely forgot it was Tuesday…

Link sure has some serious pastry and cooking skills.  This recipe, while not exactly difficult, was a bit strange.  I don’t know about you guys, but I’ve never had fish pot pie before.  I’ve never had fish anything pie before.  And while I learned that a lot of people make seafood pie, hardly anyone uses fish – it’s typically crab, shrimp, or a combination of both.  And if they do make fish pie, it’s made with a puff pastry crust, which isn’t quite as malleable and shape-able as shortcrust.  But, from past general experience and a whole lotta luck, I bring you fish pie.

Fish Piefish pie difficulty and time meter

This recipe gets a involved kinda fast.  It feels like it starts off easy and then all of a sudden food is ready to be turned, you weren’t paying attention to correct cooking order and you’re dirtying extra pans just to make it all work, your crust starts to get too warm and difficult to roll out, and children start crying.  At least, mine did!  But you got this – because we are going to do this together.

Fish Pie ingredients

First, in order to make things easier in the future, put a large cookie sheet in the fridge.  Having something cold to put your crust shapes on while you roll everything else out will make sure they stay nice and flaky!  Then we start with the filling.

all the veggies on a plateDice carrots and onion and get those peas thawed.  You can do this by either microwaving for a minute or simply running them under water.  The peas don’t need to be cooked, or even warm, since they will go through a few more heat steps before you eat them!  Heat your pan on medium and then add your oil.  Add your onions and saute (a fancy word for cooking in a minimal amount of fat over relatively high heat) until slightly tender and they turn translucent.  Add your carrots and cook for a few minutes or until the carrots are tender.  Add the peas next and cook until warm and mixed thoroughly.  Remove your veggies from the pan to a plate or bowl and put your pan back on the heat.

poaching white fish in milk

Make sure your fish is thawed properly if it was frozen and, for the first time ever, we don’t need to warm it up to room temp or even pat it down!  Add all your milk, your fish, and half the thyme, oregano, and dill to the same pan you cooked your vegetables in.  Keep the heat on medium and allow to come to a boil.  Once it’s boiling drop the heat a bit so it simmers.  Simmer your fish for 2-3 more minutes on this side and then flip them and simmer for an additional 3 minutes.  You don’t want to overcook it or the fish will get rubbery and gross in the pie.  Remove the fish to a plate, and, if you did it right, it’ll be flaky and beautiful and still a bit glistening on the inside.  Break the fish up on the plate into bite size pieces.

Now we start the roux.  Roux can be seriously hard, especially if you’ve never done it before.  I became really good at it when I was determined to make homemade mac and cheese.  It took me a long time to get it right and I had to throw out a lot of batches before I really nailed it down.  Here are my tips for a perfect roux:

Melt your butter in a heavy-bottomed saucepan over medium heat.  You could probably use a regular saucepan, but I always use my enamel dutch oven since it keeps the heat nice and even.  Wait until the butter is completely melted and bubbly.  Once it is, whisk in half the flour.  This is important!  If you try and do it all at once it probably won’t melt back down.  Once all the flour is incorporated and the mixture starts to melt and become a bit liquidy again add the remaining flour.  Whisk is continually until it starts to melt again.  At this point start timing – you’ll want to whisk continually for at least 2 minutes or until you reach the blond stage of a roux (a little darker than when you added it. you want all the flour taste to be gone!).  Once the butter/flour mixture is melty and blond start slowly adding the milk that you left in the pan.  Add about half the milk – the flour/butter may ball up on itself but just keep whisking.  Just keep whisking, just keep whisking, just keep whisking, whisking, whisking…  It’ll sort itself out!  Whisk until the mixture is homogeneous and slightly thick.  Add the remaining milk and repeat.  If the mixture is too thick you may have added too much flour.  Add regular milk until it reaches a nice, gravy-like consistency.

If you are unlucky and screw up your roux this is how you’ll know:

  • The flour and butter never reach that nice, melty stage after any flour addition
  • The flour/butter balls up when you add the milk and never mixes properly.

Don’t worry!  If one of these things happen just throw it out and start again.  Especially the first one – you can sometimes come back with even more vigorous whisking from the second but it’s very difficult to fix the first.

add veggies and fish to sauce

Once you have nice sauce add veggies, the remaining spices, and the fish.  Stir until combined, adjust spices for taste, and remove from the heat.  This we will set aside until the crust is ready!

Phew – all done with step one.  Now on to step two… which is just as long and just as rough.

Start by adding ice cubes to a cup or two of water.  You want the water to be as cold as possible!  Add all the flour and salt for the shortcrust (which, for those of you who are normal people, is pie crust) to a large bowl and whisk to mix.  Use butter flavored shortening (for a better flavor) and cut it into large chunks.  Mix in the shortening, using your hands, by rubbing the shortening into the flour until it’s combined into a nice, crumbly texture with some pea-sized clumps.

From this point forward you’ll want to handle your crust as little as possible.  The more you fiddle with it the tougher and denser the crust will be.  And we want a light, flaky crust because that’s the delicious way!  Slowly add the water 2 tablespoons at a time and combine it with the flour mixture.  I mix by hand because I have a better grasp on how the dough is actually doing.  Only add water until the mixture is just combined with some flour mixture not perfectly mixed in.  Too much water and you’ll be left with a tough, dense crust.  Take your cookie sheet out of the fridge and lightly flour a surface.  Take about 1/4 of the dough, mash it into a ball, and roll it out.  You’ll want it to be nice and thin, at least 1/8-1/4 inch, or it won’t cook evenly and your distribution of crust to filling will be weird.

fish template on crustAt this point I took a knife and, using a template I made before I started, cut out the base of the fish.  If your rolled out piece isn’t big enough just tack on more from the bowl and roll it out with the piece you’re working with to make it bigger.  Place this on the cookie sheet, gather up the scraps and lay them to the side, and repeat for another 1/4 of the dough.  Repeat two more times until you have 4 base pieces, which will be enough for two pies.  Take all the scraps, mash them into a ball, and roll them out together.  From this there should be enough, if you angle properly, to cut out all your designs perfectly.  Lay them to the side (or leave them where they’re at).

filled pie shapes

Fill two of the fish shapes to within 1/2 inch of the edge – don’t fill them too high and don’t fill that gap or your pie won’t close properly and it’ll leak.  Wet the edges with water (I use my finger because I’m super fancy), place the other fish shape on top, and press down along the edges.  Crimp each edge with a fork to help seal the dough.  Repeat for the second pie.  Wet the back of each of the designs and place it down on the fish shape where you’d like it.  Using a fork, poke a few holes in the top crust, ensuring it pokes all the way through to the center.  This will help the steam escape and keep your pie from exploding!  Beat and egg and brush the tops of each pie with it.  Place in the oven and bake for 40 or so minutes until the crust is golden brown!

fish pie

If you want my honest opinion this pie #1) tastes way better with tartar sauce smothered on top, and #2) is more work than it’s worth.  Unless you want to make something extra special and pretty I’d just cover a pie dish with your shortcrust, add the filling, cover the top, seal, and bake that way!  It’ll be much easier!  But this way definitely turned into a show-stopper for looks!

Link’s Salmon Meunière

    • Tabantha Wheat
    • Goat Butter
    • Rock Salt
    • Any Seafood

Fish Pie

  • Servings: 2 large pies
  • Difficulty: moderately difficult
  • Print

White fish pot pie with vegetables


Filling

  • 3/4 lb white fish of any kind
  • 2 cups milk
  • 1-2 teaspoons pepper
  • 1.5 tsp thyme
  • 1 tsp oregano
  • 1/2-1 tsp dill
  • 2-3 tsp salt
  • 1/2 cup carrots, diced
  • 1/2 cup yellow onion, diced
  • 1/2 cup peas, thawed
  • 1 tablespoon unsalted butter
  • 3 tablespoons flour
  • 2 tablespoons oil

Shortcrust

  • 3 cups flour
  • 1 cup butter flavored shortening
  • 4-9 tablespoons ice water
  • 1/2 tsp salt
  • 1 egg, beaten, for egg wash

Directions

  1. Put a large cookie sheet in the fridge or freezer.
  2. Dice the carrots and onion.
  3. Thaw the peas by microwaving for 1 minute or running them under water for 1 minute.
  4. Heat the pan on medium. Add the oil and onion and saute until slightly tender and translucent. Add the carrots and cook for 3-5 minutes or until tender. Add the peas and continue cooking until warm and mixed thoroughly.
  5. Remove your veggies from the pan to a plate or bowl and put your pan back on the heat.
  6. Add all your milk, your fish, and half the thyme and oregano to the same pan you cooked your vegetables in.  Keep the heat on medium and allow to come to a boil.  Once boiling, drop the heat to a simmer.  Simmer your fish for 2-3 minutes on this side. Flip the fish and simmer for an additional 3 minutes.
  7. Remove the pan from the heat, leaving the milk in the pan, and place the fish on a plate and break it into small pieces.
  8. Melt butter in a heavy-bottomed saucepan over medium heat. When the butter is completely melted and bubbly whisk in half the flour. Once all the flour is incorporated and the mixture starts to melt and become a bit liquidy again add the remaining flour.  Whisk continually until it starts to melt again. Continue whisking for about 2 minutes or until you reach the blond stage of a roux (a little darker than when you added it but not brown).
  9. Once the butter/flour mixture is melty and blond start slowly add half the milk from the pan.  Whisk until the mixture is homogeneous and slightly thick.
  10. The flour/butter may ball up on itself but just keep whisking.  Add the remaining milk and repeat.  If the mixture is too thick you may need to add an additional few tablespoons of milk. Whisk until the mixture reaches a nice, gravy-like consistency.
  11. Add the veggies, remaining spices, and fish to the sauce and stir until combined. Adjust spices for taste and remove from the heat.
  12. Add several ice cubes to a cup of water and set aside.
  13. Add all the flour and salt for the shortcrust to a large bowl and whisk to mix.
  14. Cut the shortening into large cubes. Add it to the flour and, using your hands, mix them together by rubbing the shortening into the flour until it’s combined into a nice, crumbly texture with some pea-sized clumps.
  15. Make a small well in the center of the flour mixture and slowly add the water 2 tablespoons at a time. Using your hand mix the water and flour together until combined. Continue adding water until the mixture is just combined but not perfectly mixed in. Don’t add too much water and don’t overmix or the crust will be dense and chewy.
  16. Take your cookie sheet out of the fridge and lightly flour a surface.  Take about 1/4 of the dough, mash it into a ball, and roll it out to 1/8-1/4 inch thin. Using a template (or freehanding it) cut the base of the fish out with a knife. If your rolled out piece isn’t big enough just tack on some more from the bowl and roll it out with the piece you’re working with to make it bigger.
  17. Place this on the cookie sheet, gather up the scraps and lay them to the side.
  18. Repeat step 14 3 more times to make 4 fish shapes.
  19. Take all the scraps, mash them into a ball, and roll them out together.  From this there should be enough, if you angle properly, to cut out all your designs perfectly.  Lay them to the side (or leave them where they’re at).
  20. Fill two of the fish shapes to within 1/2 inch of the edge – don’t fill them too high and don’t go in that 1/2 gap or your pie won’t close properly. Wet the edges of the pastry with water, place the other fish shape on top, and press down along the edges.  Crimp each edge with a fork to help seal the dough.
  21. Repeat for the second pie.
  22. Wet the back of each of the designs and place it down on the fish shape where you’d like it.  Using a fork, poke a few holes in the top crust, making sure it pokes all the way through to the center.
  23. Beat and egg and brush the tops of each pie with it.
  24. Bake for 40 minutes at 425°F. Allow to cool for several minutes before serving.