
There are many versions of fruitcake. It means something different in every society and region of the world. But if you take a peek at the recipe in Breath of the Wild it’s pretty obvious Link makes a Bavarian fruit cake. Now, I don’t know how to make one of these layered, intense cakes on my own so I turned to my favorite pastry cookbook, Tartine by Elizabeth Pruitt. She is an absolute star in the pastry world and her creations always look too good to be true. Instead of shifting this recipe around to make it 100% my own, which wouldn’t have worked out nearly as well or delicious, I simply adapted this recipe to make it a little more “me” and ran with it. So tighten those bootstraps, grab your handy whisk, and let’s get going on the most difficult recipe to date.
Fruitcake
With how long this recipe takes as a whole we need to prioritize. It’s like tackling a group of lizalfos – if you don’t freeze some and take out the silver one on one you’re never going to finish without dying. Same with this recipe. We start with some recipes and then, while they are “freezing” we work on the easier bits. The ice breaks, we finish it all off, and we unlock the treasure, which, in this case, is an incredible cake.

 We start with the cake. It’ll take a bit to bake and cool and we can work on other components while it does. So start with flour, baking powder, sugar, and salt in a bowl. Using a hand whisk (yes, I need to specify, we use a lot of whisks in this recipe) blend the flour mixture until well-combined and aerated. Make a well shape in the bottom of the bowl with the flour and set aside.

In the bowl of a stand mixer (or a regular bowl but you’ll be grateful for the stand mixer if you’ve got one) and another bowl separate the egg whites and yolks from 6 eggs. You can do this in a few ways, the easiest is probably one of those fancy egg-separator-thingee-mabobs you find in the cooking aisle. The cheapest is the way I do it, by slowly cracking the egg in two, keeping most of the whites and all the yolk in one side of the shell. Then slowly tip the yolk into the other shell. Keep up this slow version of hot potato until the only thing left in the egg shell is the yolk. The albumen (white part) goes in the stand mixer bowl, the yolk goes in the other bowl. And trust me, if you don’t go slowly you’ll break your yolk, which defeats the purpose. If it happens try and keep as much of it out of your bowl, dump the egg, and try again.

Repeat this process for all 6 eggs, then add the vegetable oil, water, and extract to your yolk bowl. Mix this well using your hand whisk and transfer it to your flour mixture. Whisk this in for 2ish minutes until it’s nice and smooth (you can use a normal whisk for this).
And now for the stand mixer. We need 4 more egg whites but don’t need the yolks so go ahead and throw those out. Put on the whisk attachment, add the bowl, and whisk on medium-high until the eggs get frothy. If you don’t have a stand mixer you can use a hand mixer with a whisk attachment. But don’t blame me when your arm falls off from all the vibration! Once the whites are frothy add the cream of tartar. Keep whisking until the eggs hold soft peaks. There’s a photo if you’re unsure! Then add a bit of the sugar, and, yes, you know the drill, keep whisking. Once the whites hold nice, stiff, shiny peaks it’s ready!
Here comes the part that’ll ruin your entire cake if it’s not right – we have to fold in the whites. Fold too quickly and too vigorously and you’ll lose all that beautiful air we just put in them. Fold too slowly and you’ll get bored, give up, and leave. So we scoop about 1/3 of this whites into the batter and carefully fold in by scooping from the bottom and turning over on the top. Gently continue this until it’s well mixed then add the remaining whites and fold in until just combined. Grease a springform pan with butter and then add flour. Tap out the excess flour, but make sure all your butter is covered by flour. Pour the batter into the pan and bake.

Next: the pastry cream. This will take a bit to cool, as well, so it needs to be second. Add the milk into a saucepan with the vanilla and the salt. Heat it all over medium-high heat, making sure to stir frequently. If you don’t you may burn the milk and I promise you it’ll be horrific to eat and you’ll wind up throwing it away. While the milk is warming up whisk (using a regular whisk) the eggs, cornstarch, and sugar in a bowl until smooth. When the milk is almost boiling pour about 1/3 (we like thirds here) of the hot milk into the eggs and whisk constantly. Once combined quickly add the entire mixture into the saucepan and continue to whisk and heat over medium heat until the mixture (a custard, if anyone wanted to know) becomes as thick as lightly whipped cream and is just under the boiling point (i.e. a few bubbles but not actual boiling).
Ladle (or scoop, spoon, spatula, etc…) the cream out of the pan and put it in a shallow bowl. If you leave the cream in the pan it’ll keep cooking and ruin it. Let it cool for about 10 minutes, stirring occasionally to remove some of the heat. Once it’s cool add the butter 1 tablespoon at a time and whisk until smooth.
Cover the cream with plastic wrap the same way we did the Wildberry Crepes by pressing the plastic all the way down on the top of the cream to prevent a skin from forming. Place this in the fridge to chill and take a deep breath! We are maybe 1/3 of the way through this recipe…
 When the timer goes off test the cake for doneness (which is totally a word) by inserting a toothpick. It should come out nice and clean. Remove the pan from the oven but leave the cake in it to cool. Let it cool entirely before doing anything with it.
So is that cake almost cool yet? Almost? Perfect. Once it is let’s start on the next few steps. We need to make the fruit puree (to prevent the cake from drying out), the actual cream filling, and cut all the fruit. Let’s start with the cream bit.
Again, it needs to cool a tad so timing is key. Add the gelatin to the water and let it sit for several minutes. It’s kind of cool and gross to watch so if you do I won’t judge. And while we are doing that let’s make a double boiler. To do this we need a saucepan that’ll be several inches deep with water but still have headroom for steam and either a stainless steel mixing bowl or another pan (which is what I do. We get fancy around here). Fill the first pan several inches deep with water and get it boiling. Once it is add some 1/4 cup of the chilled pastry cream to the bowl/bigger pan. Place this bowl/pan over the boiling water and pray the water doesn’t touch the pan. Heat the cream, whisking constantly, until hot to the touch. Add the gelatin (which has now become The Blob) and whisk until smooth. Remove from the heat and add half the remaining cream. Once it’s mixed add the remaining pastry cream and hand whisk until smooth.

Using a hand mixer or stand mixer with a whisk attachment whisk the cream until it holds medium-stiff peaks. Gently, using our skills from earlier, fold the whipped cream into the pastry cream mixture.
 Now for the fruit. Take about 1 pint of the washed raspberries and blend them with the sugar and salt until smooth. Pour it out and set it aside. We cut up and remove the pits from the peaches and wash the rest of the raspberries.
And now it’s cake time!
Remove the cake from the pan, finally, and carefully cut the top off to make an even level. Cut it right down the center (longways) to make two even cake layers. Line a springform cake pan (it can be the same one, just wash it first) with plastic wrap, making sure there’s extra to cover the cake at the end. Put the bottom layer of cake in so it’s nice and snug. Spoon on about half of the berry puree and then a thin layer of cream. Arrange the fruit in a nice pattern (and of course it’s the one photo I forgot to take!) and then add the remaining pastry cream. Gently add the top layer of cake and press down slightly to remove any air bubbles. Cover the top layer with the remaining puree, cover it with the wrap, and set it in the fridge to chill for at least 4 hours. If you pull it out early the cream won’t be set and the whole thing will fall apart. Trust me, I did this…
When it’s almost time (I promise, just a little more whisking) let’s make a nice whipped cream. Add the cream and sugar to a stand mixer or bowl and whisk until it holds stiff, delicious peaks. Remove the cake from the fridge and release it from the pan. Move the cake to a cake stand (if you’re cool) or just remove the plastic wrap and place it on a plate (my method). Using a spatula, add the whipped cream just like you’re icing a cake. If you’re feeling like you haven’t done enough feel free to pipe some fancy swirls on to the top. Decorate with the fruit and enjoy the spoils of your hard-won war! Congratulations and let them eat cake!

Link’s Fruitcake recipe:
-
- Apple or Wildberry
- Any fruit
- Tabantha Wheat
- Cane Sugar
Fruitcake
A Bavarian-style fruitcake with peaches and raspberries
Recipe adapted from Summer Fruit Bavarian by Elizabeth Pruitt from Tartine
Cake
- 2 1/4 cups flour
- 2 teaspoons baking powder
- 1 1/2 cups sugar
- 3/4 teaspoons salt
- 1/2 cup vegetable oil
- 6 large egg yolks
- 3/4 cup water
- 2 teaspoons vanilla extract
- 10 large egg whites
- 1/4 teaspoon cream of tartar
Pastry
- 1 cup whole milk
- 1 teaspoon vanilla
- 1/8 teaspoon salt
- 1.5 tablespoons cornstarch
- 1/4 cup sugar
- 1 large egg
- 2 tablespoons butter
Filling
- 3/4 teaspoon gelatin
- 1 tablespoon water
- 1 batch pastry cream
- 1 cup heavy cream, very cold
Raspberry
- 1/2 pint raspberries
- 1/4 cup sugar
- 1 pinch of salt
Toppings
- 2 cups heavy cream
- 1/3-1/2 cup sugar
- 1/2 pint raspberries
- 2 large peaches
Cake
- Pre-heat the oven to 325°F and grease and flour a 10 inch springform cake pan.
- Add the flour, baking powder, 1 1/4 cups of the sugar, and salt in a bowl. Whisk the flour mixture until well-combined and aerated. Make a well shape in the mixture and set aside.
- In the bowl of a stand mixer or a regular bowl and second bowl separate the egg whites and yolks from 6 eggs. You can do this by slowly cracking the egg in two, keeping most of the whites and all the yolk in one side of the shell. Then slowly tip the yolk into the other shell. Continue switching egg shells until the only thing left in the egg shell is the yolk. The albumen (white part) goes in the stand mixer bowl, the yolk goes in the other bowl. Repeat this process for all 6 eggs.
- Add the vegetable oil, water, and extract to your yolk bowl. Whisk this until smooth and transfer it to your flour mixture. Whisk the two together until it’s nice and smooth.
- In the bowl of the stand mixer add 4 more egg whites to the 6 already separated. Using the whisk attachment, whisk on medium-high until the eggs get frothy. If you don’t have a stand mixer you can use a hand mixer with a whisk attachment. Once the whites are frothy add the cream of tartar. Keep whisking until the eggs hold soft peaks. Add the remaining 1/4 cup of sugar and whisk until the whites hold nice, stiff, shiny peaks.\
- Scoop about 1/3 of the whisked whites into the yolk batter and carefully fold in by scooping from the bottom and turning over on the top of the batter. Gently continue this until it’s well mixed. Add the remaining whites and fold in until just combined.
- Pour the batter into the greased pan and bake for 45-55 minutes or until a toothpick or cake tester comes out clean. Allow the cake to cool in the pan.
Pastry
- Add the milk into a saucepan with the vanilla and the salt. Heat over medium-high heat, making sure to stir frequently to prevent burning the milk.
- While the milk is warming up whisk the eggs, cornstarch, and sugar in a bowl until smooth.
- When the milk is nearly boiling pour about 1/3 of the hot milk into the eggs and whisk constantly. Once combined quickly add the entire mixture into the saucepan.
- Continue to whisk and heat over medium heat until the mixture becomes as thick as lightly whipped cream and is just under the boiling point (i.e. a few bubbles but not actual boiling).
- Ladle (or scoop, spoon, spatula, etc…) the cream out of the pan and put it in a shallow bowl. If you leave the cream in the pan it’ll keep cooking and ruin it. Allow to cool for about 10 minutes, stirring occasionally to remove some of the heat.
- Cut the butter into tablespoons. Once the cream has cooled slightly add the butter 1 tablespoon at a time, whisking until smooth between each addition.
- Cover the cream with plastic wrap by pressing the plastic all the way down on the top of the cream to prevent a skin from forming. Place this in the fridge to chill until needed for the filling.
Filling
- Add gelatin to the water and let it sit for several minutes.
- While the gelatin is forming make a double boiler by adding several inches of water to a saucepan and heating until lightly boiling.
- Once the water is boiling add 1/4 cup of the chilled pastry cream to a second saucepan or stainless steel bowl. Place this bowl/pan over the boiling water and heat the cream, whisking constantly, until hot to the touch. Add the gelatin and whisk until smooth. Remove from the heat and whisk in half the remaining cream. Once it’s mixed add the remaining pastry cream and whisk until smooth.
- Using a hand mixer or stand mixer with a whisk attachment, whisk the cream until it holds medium-stiff peaks.
- Gently fold the whipped cream into the pastry cream mixture and set aside.
- Take about 1/2 pint of washed raspberries and blend them with the sugar and salt until smooth. Pour it out and set it aside.
Assembly
- Wash the remaining raspberries and pit and slice the peaches
- Remove the cake from the pan, finally, and carefully cut the top off to make an even level. Cut it in half to make two even cake layers.
- Line a springform cake pan (it can be the same one, just wash it first) with plastic wrap, making sure there’s extra to cover the cake at the end.
- Add the bottom layer of cake to the lined pan so it’s nice and snug.
- Spoon on about half of the berry puree and then a thin layer of cream.
- Arrange the fruit in a nice pattern and then add the remaining pastry cream.
- Gently add the top layer of cake and press down slightly to remove any air bubbles.
- Cover the top layer of cake with the remaining puree. Cover the cake with the wrap and set it in the fridge to chill for at least 4 hours.
- To make the whipped cream topping add the cream and sugar to a stand mixer or bowl and whisk until it holds stiff, delicious peaks.
- Remove the cake from the fridge and release it from the pan. Move the cake to a cake stand or remove the plastic wrap and place it on a plate.
- Using a spatula, add the whipped cream just like you’re icing a cake.
Decorate with the fruit and eat cake!
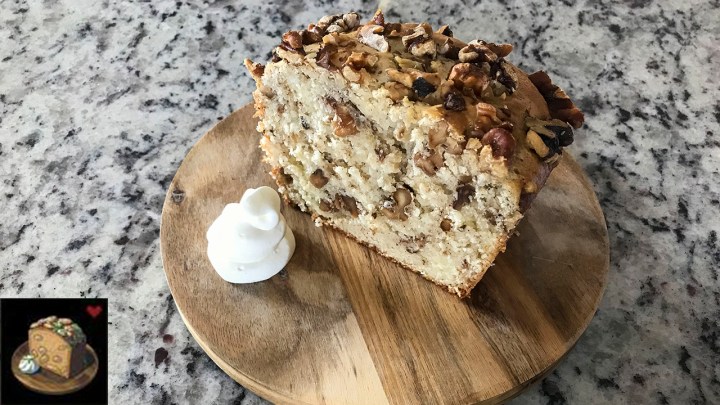

 We start by toasting the walnuts. This step, while seemingly tedious, is what gives the cake the most delicious flavor. It brings out all the nutty sweetness that you crave in something like this. Place the whole walnuts on a baking sheet in a single layer (none on top of each other). Toast at 350°F for about 10-12 minutes, stirring once halfway through. Then take them out and let them cool. It’s an easy way to take your recipes to the next level and you should definitely get in the habit of doing it every time!


 Now here comes the different part and the reason this isn’t an “easy” recipe. Add all the eggs to a bowl and whip on high, using a whisk or electric mixer fitted with a whisk attachment, until they start to get bubbly. Stop and add the rest of the sugar and all the oil, and continue whisking until the eggs get light in color, start to get fluffy, and can almost double in volume. This will take at least 5 minutes. If you’re lucky enough to have a stand mixer like a KitchenAid you can do this while grating the carrots and save yourself even more time!


 Butter a 10 inch round cake pan, making sure you get all the cracks and crannies. I prefer a springform pan because they are the easiest to get a cake out of. If you don’t use a springform you may have to flour the pan as well as butter it. Just throw in some flour after you grease it, shake it until the butter is covered, and dump out the excess. It’s pretty easy. Add the cake batter and stick it in the oven. The entire bake process is an adventure, like completing a shrine. Depending on the oven, the type of oven, how old your oven is, etc… your baking time will be different from someone else’s. But my oven bake time was about 45 minutes. Yours will be pretty close to this, but just watch starting around 40 minutes. Getting a perfectly domed cake is all about timing. Take the cake out to early (or even check on it too early) and the whole thing will collapse on you. Take the cake out late and it’ll be so dry you’ll regret eating it. So if you open the oven door to check on the cake and the center wobbles a bit close it quick and wait another 5-10 minutes before you even try again. A toothpick inserted into the center will come out clean when it’s ready!
